
Google Ads is an advertising platform owned by Google that helps people advertise their products and services across any Google tools such as YouTube, search engine, email, Google Chrome web browser, etc.
With Google Ads, advertising is made easy. Do you have any product or service you would to advertise on Google Ads in order to reach out to a large number of people? In this article, we have got you covered.
We Shall show you how to create a Google ad account step-by-step.
Note: creating a Google Ads account is free of charge. The only requirement is an email address. If you haven’t got an email address, please click here to create one.
Now, let’s start with how to create a Google Ads account for 2023 step-by-step.
How to create a Google ad account
1. Visit the Google Ads website
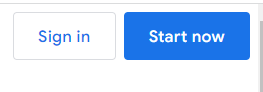
The first step you need to take when creating a Google Ad account is to visit the Google Ad account at https://ads.google.com and click the “sign in” or “Start now” tab.
2. Click “New Google Ad account”
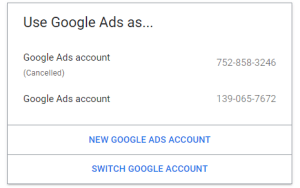
The second step is choosing between the four options you would be given. As we want to create a new Google Ad account, let’s click “NEW GOOGLE ADS ACCOUNT”
3. Choose your Google my business profile
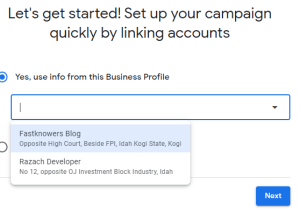
If you have already created a Google my business profile for your business, then you now need to choose the Google my Business profile.
I have created a step-by-step post like this which can guide you on how to create your own Google My Business profile. Please remember to read that before proceeding.
4.. Enter your website address
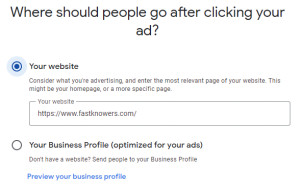
The next step now is entering your website URL or you can choose to use your Google my Business business profile website if you don’t have a real website.
For any method you choose, click next.
5. Confirm the action
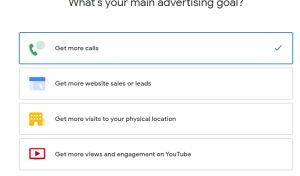
On this page, you would have to confirm the action that people would take after they click your ad.
6. Add a keywords

Now, the next step is adding the keywords which you want your ad to rank for. Importantly, Google will automatically suggest you the keywords based on your website pages and posts or keywords that you are presently ranking for.
If you are okay with adding the keyword, then click the “Next” button.
7. Select the ad location
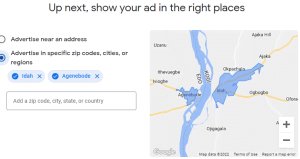
Select a country and time zone from the drop-down menus. These settings can’t be changed later, so choose carefully.
When you are done, then click “Next” again.
8. Enter the Ad budget
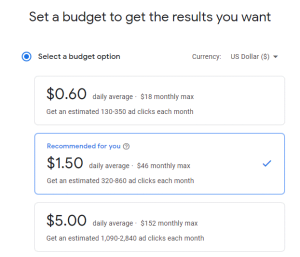
Select a permanent currency for this account. Review the available payment options for local currencies before you decide. Not all currencies are available in all areas.
9. Review your Ad
In this step, you can review your ad. Feel free to cross-check your website, budget, location, keywords, etc.
10. Initiate the payment
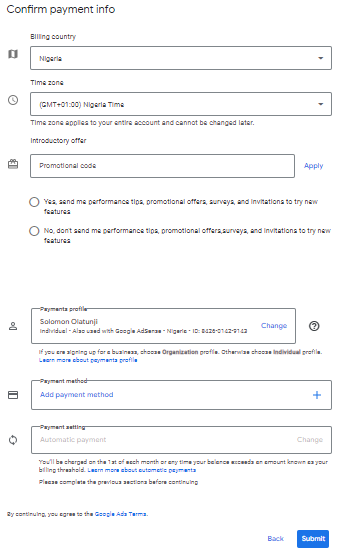
Last but not least, enter your payment information and initiate the payment. After entering your information, click “Submit”.
Tip: when it seems that you are confused, you can invite your friend or someone you know to come and join you by sending him/her an invitation.
To invite another user, enter their email address and select the level of access you want to grant them: “Administrative access,” “Standard access,” or “Read-only access.”
If you know that this post has helped you know what Google Ads is and how to create an account, then please share it with your friends and remember to click the bell icon displayed on the screen to subscribe to our newsletter for more important updates.