The HTML div tag is commonly used among web developers everywhere, and in this article, I will share my idea with you on how to use it with CSS to create a footer navigation menu of a website, draw circles, squares, and a Nigerian flag. You may see our expert guide on how to add menus to a WordPress blog.
Just keep in mind that you should usually use semantic HTML in place of the div tag unless none of them (the semantic tags) really match the content to group together. This is because semantic tags are better for accessibility and SEO.
In short, the div tag remains useful and isn’t going anywhere anytime soon, so feel free to use it when necessary.
Div tags are commonly used to group similar content together. In older and even some newer web pages. Despite the fact that semantic tags are recommended for accessibility and better SEO, you’ll find divs all around.
Since div tags are very common, and applying class and id attributes to them so you can manipulate individual div elements with those attributes is very recommended.
Now, let me start walking you through how to use Div tag by creating a navigation menu.
How to create a navigation menu (header and footer) of a website using a Div tag
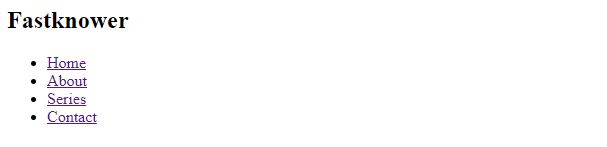
When you are designing a website, the first section you’ll want to make is the header which contains the logo, navigation menu, search icon (depending on website type), etc. Below is a code to create a header section with ”Home”, ”About”, ”Series”, and ”Çontact”.
 <div class="header">
      <h2 class="logo">Fastknower</h2>

      <ul class="nav">
        <li><a href="">Home</a></li>
        <li><a href="">About</a></li>
        <li><a href="">Series</a></li>
        <li><a href="">Contact</a></li>
      </ul>
</div>
Here is the result of the code above.
Now, we can style the navigation menu by using CSS to make the unordered list which has a class of ”nav”, <ul class=”nav”> align correctly and display nicely, let’s add the CSS code below.
* {
   margin: 0;
   padding: 0;
   box-sizing: border-box;
 }

.home,
.about,
.services,
.contact {
  max-width: 1000px;
  margin: 0 auto;
  margin-bottom: 20px;
}
In the CSS code snippet above:
- The default margin and padding were removed
- The maximum width for the main sections was set so they don’t go all across for better UX
- The margin at the bottom of each section was set to give them some space
- A margin of 0 at the top and bottom and auto on the left and right were set to center them.
Now, to style the navigation menu (navbar) appropriately, grab the container div tag with its class attribute, header. Give it a display of flex, alongside some other properties to lay it out nicely, grab the div wrapped around the navbar (ul element) by its class and lay it out with Flexbox.
.header {
      padding: 0 70px;
      display: flex;
      align-content: center;
      justify-content: space-between;
      margin-top: 20px;
      margin-bottom: 20px;
    }

.nav {
      display: flex;
      align-content: center;
      justify-content: center;
      gap: 60px;
      list-style-type: none;
    }

.nav li a {
      text-decoration: none;
      color: black;
      font-size: 1.2rem;
    }
Here is the result of the code above for displaying the header that contains a logo and navigation menu.

For the remaining sections apart from the footer, the HTML and stylings are generic:
<div class="home">
      <h1>Home Section</h1>
</div>
<div class="about">
      <h1>About Us</h1>
</div>
<div class="services">
      <h1>Our Services</h1>
</div>
<div class="contact">
      <h1>Contact Us</h1>
</div>
<div class="footer">
      <p>Copyright 2023. Fastknowers, All Rights Reserved</p>
</div>
.home {
background-color: #eee;
height: 200px;
}
.home h1 {
display: flex;
align-items: center;
justify-content: center;
line-height: 6;
}
.about {
background-color: #eee;
height: 200px;
}
.about h1 {
display: flex;
align-items: center;
justify-content: center;
line-height: 6;
}
.services {
background-color: #eee;
height: 200px;
}
.services h1 {
display: flex;
align-items: center;
justify-content: center;
line-height: 6;
}
.contact {
background-color: #eee;
height: 200px;
}
.contact h1 {
display: flex;
align-items: center;
justify-content: center;
line-height: 6;
}
.footer {
background-color: #777;
height: 40px;
}
.footer p {
margin: 0 auto;
line-height: 1.7;
}Individual sections were given a greyish background color and a height of 200px. The h1 tags were positioned to the centers with Flexbox and applied a line height of 1.5 was given to each of them.
The footer was given a deeper grey background color to make it distinct and the content in it was centered with a line height of 1.7.
The resulting layout looks like this:
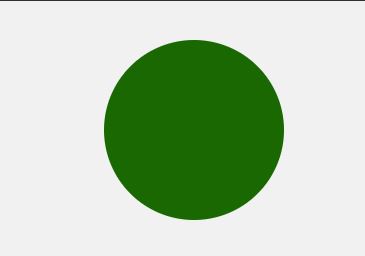
How to use a div tag to draw a circle
CSS is a styling coding language that you can creatively use to draw different types of shapes using a Div tag. In this section, I will show you how you can use it to draw a circle. To start, you need a div tag by coding an empty div in the HTML, setting an equal height and width for it in the CSS, then a border-radius of 50%.
<div class="circle"></div>
body {
      display: flex;
      align-items: center;
      justify-content: center;
      margin: 0 auto;
      height: 100vh;
      background-color: #f1f1f1;
    }

    .circle {
      background-color: #196801;
      width: 200px;
      height: 200px;
      border-radius: 50%;
    }
Here is the result.
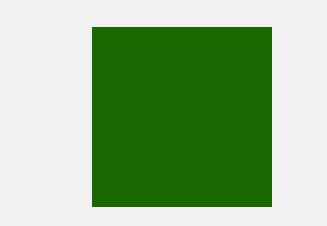
How to draw a square using a CSS code snippet
You can also draw a square with div tag just like how we created the circle above. What you need to do first is to define an empty div tag and attach a class attribute to it in the HTML. Then in the CSS, select the div with the class attribute and set an equal height and width for it.
<div class="square"></div>
body {
      display: flex;
      align-items: center;
      justify-content: center;
      margin: 0 auto;
      height: 100vh;
      background-color: #f1f1f1;
    }
.square {
      background-color: #196801;
      width: 200px;
      height: 200px;
    }
Here is the result.
How to draw the Nigerian flag with a div tag using CSS
As explained earlier, a Div tag can be used to create different styles of drawing. In this section, we are going to draw the Nigerian flag with it. The Nigerian flag is a rectangular shape with the colors green, white, and green.
So, to draw it, define 3 div tags and attach different classes, then style them appropriately in the CSS as done in the first place of drawing square.
<div class="nigerian-flag">
    <div class="first-green"></div>
    <div class="white"></div>
    <div class="second-green"></div>
</div>
.nigerian-flag {
display: flex;
}
.first-green {
height: 100px;
width: 60px;
background-color: green;
}
.white {
height: 100px;
width: 60px;
background-color: white;
}
.second-green {
height: 100px;
width: 60px;
background-color: green;
}Now, here is the result.

How to style a div tag
A div tag is very easy to style. It’s one of the reasons why many web designers use it to group similar content because it accepts almost all CSS properties without a problem. Let me show you how to style the div tag using the CSS code below.
How to add color to the div tag
You can add color and background on content that is grouped together with the div tag. Below is an example;
<div class="color-properties">
  <p>
    Lorem ipsum dolor sit amet consectetur adipisicing elit. Voluptate quo
    ullam modi alias assumenda, itaque libero? Quas quidem sint illo.
  </p>
  <p>
    Lorem ipsum dolor sit, amet consectetur adipisicing elit. Necessitatibus
    ipsam eaque rem dicta, quos quas ipsum.
  </p>
</div>
.color-properties {
color: white;
background-color: #196801;
}Here is the result.

How to add a shadow around content using the Div tag
You can add a shadow around a content (paragraph, image, table, list, etc.) with the div tag using the box-shadow property as shown below:
<div class="box-shadow">
      <p>
        Before paying to learn programming, checkout www.fastknowers.com
        <br />
        Their HTML, CSS, and JavaScript curricula would take you from beginners to professional in web development.
      </p>
      <p>
        There is a Python curriculum that will get you a considerable knowledge
        in Python <br />
        And an upcoming Data Science curriculum.
      </p>
</div>
.box-shadow {
font-family: cursive, sans-serif;
background-color: #2ecc71;
color: white;
padding: 10px;
border-radius: 4px;
box-shadow: 2px 2px 20px 23px #7fecad;
}Here is the result.

What has happened in the CSS above that generated this outcome?
Here is the explanation. I used a class or property named ”box-shadow”.
- The first value (2px) represents the offset on the x-axis (offset-x)
- The second (another 2px) represents the offset on the y-axis (offset-y)
- The next 20px is for the blur-radius, that is, how blurry you want the shadow to be.
- The 23px value is the spread radius (how far you want the shadow to spread)
- The last value is the shadow color – in this case, #7fecad.
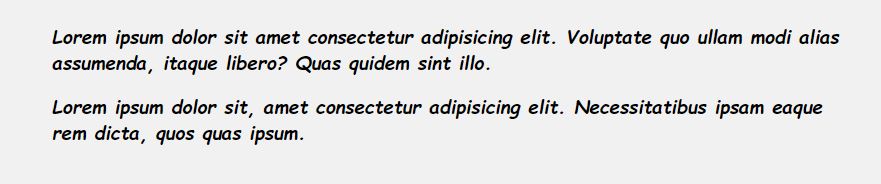
How to add font properties to content with the div tag
If you use CSS properties such as font-size, font-family, font-weight, and font-style, you can style content (texts) that are grouped together with the div tag. Below is an example.
<div class="font-properties">
      <p>
        Lorem ipsum dolor sit amet consectetur adipisicing elit. Voluptate quo
        ullam modi alias assumenda, itaque libero? Quas quidem sint illo.
      </p>
      <p>
        Lorem ipsum dolor sit, amet consectetur adipisicing elit. Necessitatibus
        ipsam eaque rem dicta, quos quas ipsum.
      </p>
</div>
body {
max-width: 900px;
display: flex;
align-items: center;
justify-content: center;
margin: 0 auto;
height: 100vh;
background-color: #f1f1f1;
}
.font-properties {
font-family: cursive, sans-serif;
font-size: 1.3rem;
font-weight: bolder;
font-style: italic;
}Here is the result.
How to add styles to texts with a div tag
By using the CSS text-transform and text-decoration properties or classes on a text that are grouped in a div tag will help you add styles to texts on a website:
<div class="text-properties">
  <p>
    Lorem ipsum dolor sit amet consectetur adipisicing elit. Voluptate quo
    ullam modi alias assumenda, itaque libero? Quas quidem sint illo.
  </p>
  <p>
    Lorem ipsum dolor sit, amet consectetur adipisicing elit. Necessitatibus
    ipsam eaque rem dicta, quos quas ipsum.
   </p>
</div>
.text-properties {
text-transform: uppercase;
text-decoration: underline;
}Here is the result.

Conclusion
The div tag is a popular HTML language used by web developers and designers most of the time.
Hope this article has helped you know how to use a Div tag to style with CSS in seamlessly designing a website like creating a navigation menu; header and footer and styling website content. Please subscribe to our YouTube channel if you know that it is helpful. You can also find me on Facebook.
Do you have any questions concerning the uses of Div tag in styling with CSS? Drop your questions in the comment section. I will get back to you soon.