While AdSense undoubtedly provides a valuable revenue stream, there are instances where displaying ads on every page might not align with your broader content strategy or user experience goals. In this guide, we’ll show you can disable AdSense ads on some specific pages or posts on your website by simply adding a JavaScript code at the head section on your website.
You will not have to deal with any core area of your website in adding code to your website head section via theme file editor if you are a beginner as I will show you how you can seamlessly add that code to your website head section using plugin for free. You may see our expert guides on how to install and activate plugins on WordPress websites.
You may have habituated to partner with Google AdSense to monetize your website content (pages and posts) and generate income through strategically AdSense-placed ads. I know that because I am a blogger who likes Adsense earning and does not want to disable Ads on any of my website content.

Why disabling Google AdSense ads from your website content
But while Google AdSense is a reliable and lucrative advertising platform, there are scenarios where displaying ads on every content on your website may not be in your best interest. Here are some reasons to consider:
1. Content Relevance:
Not all content on your website is created equal. Certain articles or pages may delve into sensitive topics or provide specialized information that doesn’t pair well with generic ads. By selectively disabling AdSense on such pages, you maintain control over the relevance of ads to your content.
2. User Experience:
Advertisements can impact the overall user experience, especially on pages where your audiences need in-depth information or engage with your content more actively. Disabling ads on these pages can enhance user satisfaction and encourage longer stays on your site.
3. Web Design Considerations:
Maintaining a clean and visually appealing website is crucial. On some pages, the inclusion of ads might disrupt the aesthetic flow you’ve carefully crafted. Disabling AdSense on these pages ensures a seamless integration of content and design.
How to disable Google AdSense ads on some of your website content
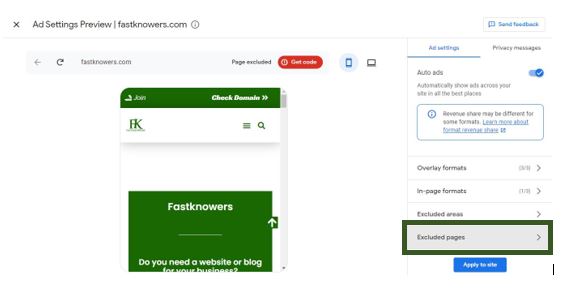
While tools like the “Manage page exclusions” feature on the Google AdSense dashboard and plugins such as “Ads Inserter” offer convenient ways to disable the ad displaying on your website, these methods do not provide the result. Because I had tried to use all of them to disable AdSense ads on my website but they did not work. I was told that I should wait for the next twenty-four hours for the changes to propagate, but they have not worked after waiting for more than several months.
Then I coded a JavaScript program to help disable any Google AdSense ads from displaying on any web page or post I do not want to display ads on on my website. I will share with you that JavaScript code in this guide later. Do you know why that code is too effective? Below are some of its features.
Features of JavaScript code that disables AdSense ads on some website content
1. Precision in Targeting:
The JavaScript code allows for a granular level of control over ad display by directly manipulating the ad request process based on the current page’s URL. This level of precision ensures that AdSense ads are disabled only on the specific pages you designate, preventing inadvertent exclusions or overrides that might occur with broader exclusion methods.
2. Independence from AdSense Settings:
While the AdSense dashboard provides tools for managing ad placements, these settings are primarily configured at the account or ad unit level. The JavaScript solution operates independently at the page level, offering a more nuanced and adaptable approach. This is particularly valuable when you have specific pages with unique content considerations that may not align with global ad settings.
3. Bypassing Plugin or Theme Compatibility Issues:
Plugins like “Ads Inserter” rely on the compatibility and correct functioning of the plugin within your specific website environment. If there are conflicts with other plugins or theme components, these conflicts may interfere with the plugin’s ability to disable ads as intended. The JavaScript code operates directly in the browser, avoiding potential conflicts and providing a more reliable solution.
4. Dynamic Adaptability:
The JavaScript code is dynamic and can be easily modified to adapt to different exclusion scenarios. You can add different URLs as needed for various pages, allowing you to tailor ad display settings to the unique requirements of each page. This flexibility is especially beneficial for websites with diverse content types.
5. Ease of Implementation:
Adding the JavaScript code to the head section of your website is a straightforward process that doesn’t require extensive technical knowledge. It can be easily done through the theme file editor or with the help of plugins like “Insert Headers and Footers.”
While other methods provided by AdSense and plugins do not work, the JavaScript solution presented in this guide helps disable AdSense ads on specific pages.
JavaScript code to disable Google AdSense ads on some content on your website
Here is the JavaScript code that helps to disable Google AdSense ads on some specific content (posts and pages) on your website:
<script type="text/javascript"> (function() { var disabledPageUrl = "https://yourwebsite.com/target-page/"; var currentUrl = window.location.href; if (currentUrl === disabledPageUrl) { (adsbygoogle = window.adsbygoogle || []).pauseAdRequests = true; } })(); </script> But remember to replace "https://yourwebsite.com/target-page/" with the URL of the page where you want to disable AdSense ads. Now, let’s show you how you can use the JavaScript above to disable AdSense ads on some pages and posts on your website.
Adding JavaScript Code via Theme File Editor or Plugin
Step #1: Identify Target Pages: Determine the specific pages where you want to disable AdSense ads. This might include landing pages, resource pages, or any content that requires a focused user experience.
Step #2: Access Theme File Editor or Use a Plugin: Navigate to your theme file editor or install a WordPress plugin like “Insert Headers and Footers” to manage your site’s scripts.
Step #3: Insert JavaScript Code: Add that JavaScript code to your site’s head section:
Method #1: Inserting the code via the theme file editor
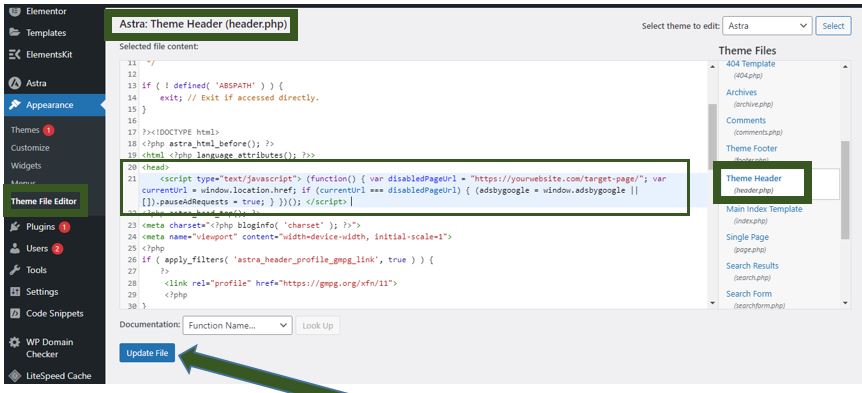
If do not want to install the insert header and footer plugin to add this JavaScript code on your website head section, then login to your WordPress dashboard, click Appearance, click Theme file editor, at the right hand find theme header, and paste the code between the <head> —— </head> of the file. After that, click the update file button. It is recommended to back up your website before tempering with your theme file so you will not lose your website design in the process. You may see our guide on how to back up the WordPress website step-by-step.
Method #2: Inserting the code via insert headers and footers plugin
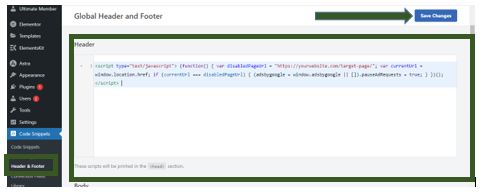
If you want to insert this JavaScript code via a plugin, then login to your WordPress dashboard, click plugin, click add new plugin, search for insert header and footer, find code snippet plugin, and click the Install button beside it. then click the activate button after it has successfully been installed. Now, the code snippet plugin has added a new menu on your WordPress dashboard. Click on it paste the code at the header section and click the save changes button.
Step #4: Save Changes: Save the changes to your theme file or plugin settings. The provided JavaScript code will now prevent AdSense ads from displaying on the specified page.
Conclusion
By using this JavaScript code, Google AdSense ads will not display on specific pages and post on your website. This will allow you to sell your products and services to your audience while having and good user experience. Not displaying ads on your content helps you to maintain your integrity as a digital marketer, hence, your audience will listen to you.
I hope this guide has shown you how you can disable Google AdSense ads on some specific pages and posts on your website. You may also see our expert guide to know how much Adsense pays per page view.
If you know that this guide has helped you know how to disable Google AdSense ads on some specific important pages and posts (content) on your website, then, please subscribe to our YouTube channel for more updates that relate to this from us in the future. You can also find me on Facebook.