Hi welcome to this page where we shall code a web page to get a clean checkout page with a responsive design that is suitable for different screen sizes. We shall use HTML to define the structure and CSS to provide styling.
If you are reading this article in order to help you code a checkout page, that means you are very good at HTML and CSS. However, we shall explain every part in this guide step-by-step. Our aim in this guide is to create a checkout web page using HTML and CSS. You may also read how to code a comment box on a website using HTML and CSS.
Checkout, as its name implies, is a feature of an e-commerce website, it helps your customers to carry out a secure and efficient completion of transactions. It is during the checkout they determine how many of your products or services they want to order. The checkout page helps them know your shipping fee and the price they will pay.

HTML and CSS codes for an e-commerce website checkout page
Now that you have understood why it is important to get a checkout page and also know that it can be created using HTML and CSS, let’s start to code it.
In this checkout page we are going to code, we won’t code website navigation menu and footer section because we had already written a step-by-step guide on them. You may see how to code a website header that scrolls and sticks after some scroll using HTML and CSS. However, we shall have a header called ”Checkout page”.
The way we are going to style this page is responsive. On desktop, the product section is located at the right sidebar while they will be at the top section of the page on mobile device.
First, using HTML code, our header text is Checkout Page in </h3>. Then our shipping details section and contact information section will be in a <h6> heading.
This page is divided into five sections; personal details of the customer, billing address, shipping address, payment confirmation and order confirmation section.
Now, let us start coding.
Personal details
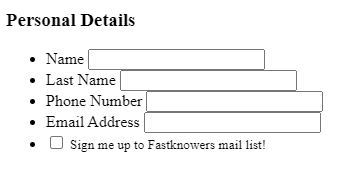
At the personal details section, we shall need the customer first name, last name, phone number and email address. We shall also add an agreement box beside it for requesting the user to sign up to our newsletter. Below is the HTML code for it.
<div class="left">
<div class="form_header">
  <h3>Personal Details</h3>
</div>
<div class="container">
<ul>
  <div>
  <li>
    <label for="">Name</label>
    <input type="text" />
  </li>
  <li>
    <label for="">Last Name</label>
    <input type="text" />
  </li>
  </div>
  <div>
  <li>
    <label for="">Phone Number</label>
    <input type="text" />
  </li>
  <li>
    <label for="">Email Address</label>
    <input type="text" />
  </li>
  </div>
  <li>
    <input type="checkbox"> <small>Sign me up to Fastknowers mail list!</small>
  </li>
</ul>
</div>
Here is the preview of the HTML code above for personal details section (note that we haven’t styles it with CSS yet).
Billing address section
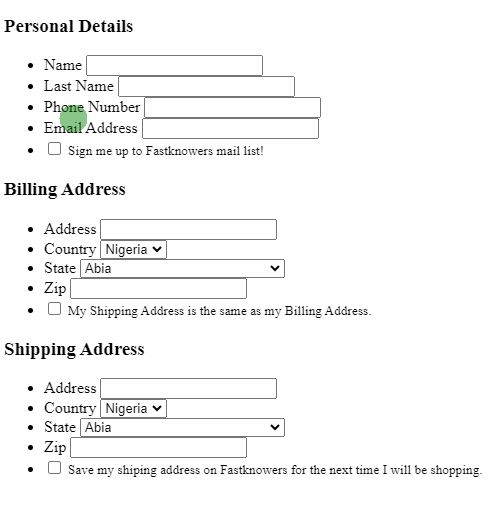
At the billing address, we need to collect customer address, city, state and ZIP code (same as shipping address). Below is the code. Simply duplicate it and create a heading section for shipping address.
<div class="form_header">
  <h3>Billing Address</h3>
</div>
<div class="container">
<ul>
  <div>
  <li>
    <label for="">Address</label>
    <input type="text" />
  </li>
  </div>
  <div>
  <li>
    <label for="">Country</label>
    <select name='options'>
      <option value='option-1'>Nigeria</option>
    </select>
  <li>
      <label for="state">State</label>
      <select name="state" id="state">
        <option value="Abia">Abia</option>
        <option value="Adamawa">Adamawa</option>
        <option value="Akwa Ibom">Akwa Ibom</option>
        <option value="Anambra">Anambra</option>
        <option value="Bauchi">Bauchi</option>
        <option value="Bayelsa">Bayelsa</option>
        <option value="Benue">Benue</option>
        <option value="Borno">Borno</option>
        <option value="Cross River">Cross River</option>
        <option value="Delta">Delta</option>
        <option value="Ebonyi">Ebonyi</option>
        <option value="Edo">Edo</option>
        <option value="Ekiti">Ekiti</option>
        <option value="Enugu">Enugu</option>
        <option value="FCT">Federal Capital Territory (FCT)</option>
        <option value="Gombe">Gombe</option>
        <option value="Imo">Imo</option>
        <option value="Jigawa">Jigawa</option>
        <option value="Kaduna">Kaduna</option>
        <option value="Kano">Kano</option>
        <option value="Katsina">Katsina</option>
        <option value="Kebbi">Kebbi</option>
        <option value="Kogi">Kogi</option>
        <option value="Kwara">Kwara</option>
        <option value="Lagos">Lagos</option>
        <option value="Nasarawa">Nasarawa</option>
        <option value="Niger">Niger</option>
        <option value="Ogun">Ogun</option>
        <option value="Ondo">Ondo</option>
        <option value="Osun">Osun</option>
        <option value="Oyo">Oyo</option>
        <option value="Plateau">Plateau</option>
        <option value="Rivers">Rivers</option>
        <option value="Sokoto">Sokoto</option>
        <option value="Taraba">Taraba</option>
        <option value="Yobe">Yobe</option>
        <option value="Zamfara">Zamfara</option>
      </select>
    </li>
  <li>
    <label for="">Zip</label>
    <input type="text" />
  </li>
  </div>
  <li>
    <input type="checkbox"> <small>My Shipping Address is the same as my Billing Address.</small>
  </li>
</ul>
</div>
Below is the preview of billing address and shipping address.
Payment confirmation section
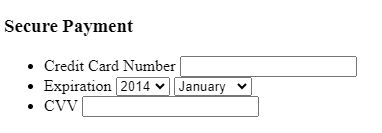
At the payment confirmation section, customers will be required to enter their card number, expiry date and CVV/CVC. This checkout page will have a button (Checkout).
  <div class="right">
<div class="form_header">
  <h3>Secure Payment</h3>
</div>
<div class="container">
<ul>
  <div>
  <li>
    <label for="">Credit Card Number</label>
    <input type="text" />
  </li>
  <li>
    <label for="">Expiration</label>
    <select name='options'>
      <option value='option-1'>2014</option>
      <option value='option-2'>2018</option>
      <option value='option-3'>2017</option>
    </select>
    <select name='options'>
      <option value='option-1'>January</option>
      <option value='option-2'>February</option>
      <option value='option-3'>March</option>
    </select>
  </li>
  </div>
  <div>
  <li>
    <label for="">CVV</label>
    <input type="text" />
  </li>
  </div>
</ul>
</div>
Below is the preview of the HTML code for payment confirmation section.
Order confirmation section
An order confirmation section does not contain anything but brief information to thank the customers and also let them know when they will expect the delivery of their order. Here is an example with the HTML code.
<div class="form_header">
  <h3>Order Confirmation</h3>
</div>
<div class="container">
  <ul>
    <div>
      <li>
        <input type="checkbox" /> <small>Thank you for patronage to shop on Fastknowers! Your items are carefully selected and will soon be on their way to you. We appreciate your choice and trust in our products.</small>
      </li>
    </div>
    <div>
      <li>
        <h4>Your total is: $100</h4>
      </li>
      <li>
        <input type="submit" value="Checkout" />
      </li>
    </div>
  </ul>
</div>
Below is the preview of the HTML code above.

Note that in a checkout webpage, the total price of products is typically calculated on the server side, based on the items that the user has selected. The calculation is involved by multiplying the quantity of each item by its unit price and then summing up these values. The total price is then sent to the client side and displayed in the user interface.
Below is a basic example of HTML and JavaScript assuming you have a server-side language (such as PHP) to handle the calculations.
<!DOCTYPE html>
<html lang="en">
<head>
  <meta charset="UTF-8">
  <meta name="viewport" content="width=device-width, initial-scale=1.0">
  <title>Checkout Page</title>
  <script>
    function updateTotal() {
      // Get quantity and unit price values from the form
      var quantity = document.getElementById('quantity').value;
      var unitPrice = document.getElementById('unitPrice').value;
      // Calculate the total price
      var totalPrice = quantity * unitPrice;
      // Display the total price in the HTML element with the id 'total'
      document.getElementById('total').innerHTML = 'Total: $' + totalPrice.toFixed(2);
    }
  </script>
</head>
<body>
  <h1>Checkout Page</h1>
  <!-- Form to input quantity and unit price -->
  <form>
    <label for="quantity">Quantity:</label>
    <input type="number" id="quantity" min="1" value="1" oninput="updateTotal()" required>
    <br>
    <label for="unitPrice">Unit Price ($):</label>
    <input type="number" id="unitPrice" min="0.01" step="0.01" value="1.00" oninput="updateTotal()" required>
    <br>
    <!-- Display the total price -->
    <p id="total">Total: $1.00</p>
    <br>
    <input type="submit" value="Proceed to Checkout">
  </form>
</body>
</html>
This is a simple example using JavaScript to update the total price dynamically as the user changes the quantity or unit price. In a real-world scenario, the calculation would typically be done on the server side to ensure security and accuracy, and the total would be sent to the client side for display.
CCS code to style the above HTML codes
Now, let us begin to style all the sections created above using CSS code.
.form_header {
  margin-top:10px;
 h3 {
  margin:0;
  padding:10px;
  color:#fff;
  background-color:#196801;
  font-family:sans-serif;
  font-weight:300;
 }
}
.container {
  border:1px solid #ebebeb;
  padding:10px 0;
  @include border-radius(4px);
  font-family:sans-serif;
  min-height:215px;
  ul {
    li {
      list-style:none;
      margin:10px 0;
      display:inline-block;
      label {
       display:block;
      }
      input[type="text"], select {
       border:1px solid #ebebeb;
       padding:5px;
      }
      input[type="submit"] {
       border:0;
       background-color:#196801;
       @include border-radius(4px);
       color:#fff;
       padding:10px 40px;
       @include box-shadow(0px 2px 0px #1cb1fe - 50);
       border-top:1px solid #1cb1fe + 50;
      }
      h4 {
       font-size:1.5em;
       font-weight:800;
      }
    }
  }
}
.left {
 display:block;
  width:100%;
  float:left;
  clear:both;
}
.right {
 display:block;
  width:100%;
  margin-left:0;
  float:left;
  clear:both;
}
@media only screen and (min-width: 481px) {
.left {
 display:block;
  width:49%;
  float:left;
  clear:none;
}
.right {
 display:block;
  width:49%;
  margin-left:2%;
  float:left;
  clear:none;
}
}
The video below shows the preview of the checkout page we just coded above.
https://va.media.tumblr.com/tumblr_s660wylAd31a9yx56.mp4Conclusion
I hope this article has shown you how to create a checkout page for e-commerce websites. You may also see our expert guide on how to create metadata for your content.
If you know that this guide has helped you know how to code a checkout page for e-commerce websites, then subscribe to our YouTube channel for more updates. You can also find me on Facebook.