Plugins act the same way that an application does on a mobile phone. There are thousands or even millions of plugins available in the WordPress directory. Today’s guide will discuss with you how you can install plugins on the WordPress website.
In the olden days, it was only web development experts could develop websites as writing programming code was the only way that websites could be developed. But now that technology has come, software developers and other WordPress experts have developed plugins that everyone can develop any type of website with. That is why our aim on this website is to help beginners get websites for their businesses. You may see how we can help set up a WordPress blog for you for free.
With plugins, you don’t need to write any code or go through any technical stuff while trying to add features and functions to your website, that is to say, everything in the plugin is drag and drop.
The major benefits of plugins are they help web designers and developers the flexibility to seamlessly add features and functionality to websites without writing a lot of code or no code at all.
You can install plugins using two methods. Method one is uploading it after you have downloaded it from the WordPress plugin directory and the second method is directly installing and activating it via your WordPress dashboard. You can also install the plugin via the FTP method
Note also that there are some WordPress plugins that have both free and paid plans while there are some that are completely free.
A paid WordPress plugin provides more features than a free one. However, if you don’t have money to purchase a paid WordPress plugin, then you can go for the free one as you will upgrade to the paid version when your website or blog is growing.
In this article, we shall discuss with you how to install plugins on your WordPress blog or website using those two available methods.
Read these also:
1. How to use Paystack to receive and transfer money (step by step).
2. How to create a school website for free.
3. Best topics that a web design company should blog about.
4. Differences between a blog and a website (vivid explanation).
5. How to become a blogger in Nigeria (step by step).
Now, let’s get started. I will show you two methods on how to install plugins on WordPress.
1. How to install plugins on WordPress websites via the dashboard
- First, log in to your WordPress dashboard at https://yourwebsite.com/wp-admin/
- Click Plugins, then click “Add new”.
- Now, search for a plugin with the search bar in the top right corner.
- Doing so, different plugins that match your search will appear.
- Check through the plugins that have appeared in the results and click “Install Now”
- After installing, then go to your dashboard to activate it in order to be able to use it.
Also, there is another method used to install plugins on WordPress websites. This method is for those who purchase paid plans from the developer’s website.
Let’s look at the procedures involved in uploading a downloaded plugin on WordPress websites.
2. How to install downloaded plugins via the WordPress directory
There are some plugins that can’t be downloaded directly from the WordPress directory unless their link is sent to you by their developers. When Elementor was earlier created, it could not be installed from the WordPress directory unless you created an account with them, then you downloaded it from your dashboard. Nevertheless, both of the methods are the same.
If you have a downloaded file of a plugin and you want to upload it on your website so that you can install and activate it, here is the step.
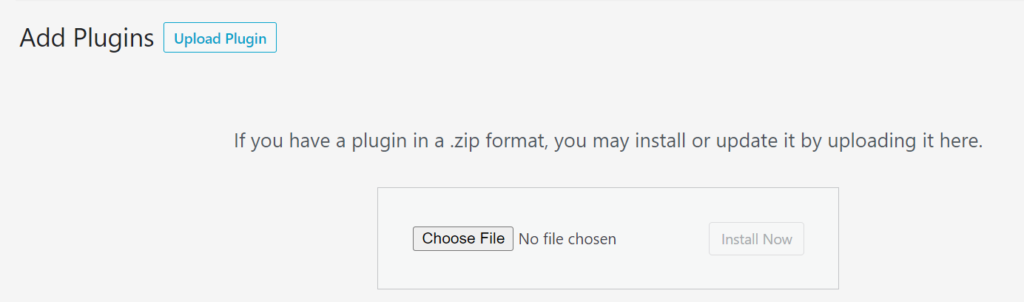
- Go and download the plugin from the plugin source; WordPress directory, plugin website, etc.
- Log in to your WordPress dashboard and click “Plugin”, then click “Add New”
- Click the “Upload Plugin” button which is at the top of the page.
- Now, click “Choose File”
- Locate the plugin source on your desktop file explorer and upload it
- Finally, click “Activate Plugin”.
Which type of websites that plugins can be installed on?
Plugins can only be installed on WordPress.org-powered websites. If you are using the WordPress.com platform, you would not be able to use the plugin unless you have upgraded to a premium plan. You may see our expert guide on the differences between WordPress.com and WordPress.org.
While you know how to install and activate plugins on WordPress websites, it is also important to know that more plugins add more code to websites that users’ browsers have to load, which can slow your website down if their browsers (old devices or outdated browsers) can’t be able to load as fast as possible. So be mindful about the number of plugins you install on your website.
Before you install any plugin on your website, make sure that the plugin is from a verifiable source, that is, it was coded by a reputable team or company, it is updated regularly, your current version of WordPress supports it, a number of people that had downloaded it because the higher download the plugin has the better it is.
According to wpengine.com, 20 plugins are a pretty good number. The upper limit would be 30 plugins. Anything above 30 is too much. That is, the number of plugins on a website should not be more than 30.
Conclusion
It is not compulsory that you install the plugin on your WordPress website. Plugins are coded to help you add features to your website without writing a single line of code. If you know how to use plugins, you don’t need to hire a web designer to design your website. With Elementor page builder, you can build a website from scratch. You may see our expert guide on how to use Elementor to design a website.
I hope this article has helped you know how you can install and activate plugins on the WordPress website. If you know that it has helped you, please subscribe to my YouTube channel or our newsletter for more updates. You can also find me on Facebook.


I want to appreciate you and beg you to continue creating and managing this platform for us. It helps beginners like me a lot 🤝
Hi Rana
Thanks for your feedback
Hi Rana
Thanks for your feedback
I really appreciate 🙏
I got a valuable guide from this insightful article. Keep updating this platform with such this post.
Hi sam
Thank you for sharing your feedback
Is it good to just deactivate the plugin and leave it? Does that consume spaces on my web hosting? I need your advice sir please because I want to use the deactivated plugins in the future. 🙏🙏
Do not deactivate plugins and leave them on your website. If you deactivate them, delete them. I like your curious question, dear Takayuki.
How many plugins should a website or blog get at a time? Please I need an answer. 🙏
Can plugins be installed on a WordPress-powered website via cPanel? There’s a web developer that works for me, he doesn’t ask for our Wp login credentials 🙅♂️ he only request for our cPanel login and before we know he delete and install plugins he wants on our website 😊
Though his work is amazing. But I want to ask you for confirmation: is what this guy doing right? Can you let me know more what this guy does? 🤔