Do you want to know how to add a favicon to your blog or website? If yes, then this article has got you covered. Today, I will show you how to add a favicon to your blog or website step-by-step. Whether your blog is built in Bootstrap or WordPress, you will this guide helpful.
First impression is everything. While you focus designing your blog, it can be one small thing that will leave a lasting impact. One such thing is the favicon — the tiny icon that appears in browser tabs, bookmarks, and mobile shortcuts which represents your blog and website.
The favicon plays a big role in shaping your blog’s identity and improving user experience. In this article, we’ll dive into everything you need to know about favicons, including how to create one and easily add it to your blog or website. You may see our guide on the complete guide to website design (using Wix).
Now, let us start.
What is a favicon?
A favicon (short for “favorite icon”) is a small, distinctive icon that represents a blog or website or a web page. It appears in several key places such as:
- Browser Tab: When a user visits your website, the favicon appears in the tab next to the title.
- Bookmarks: When someone bookmarks or saves your website, the favicon is shown next to the saved link.
- Browser Address Bar: Favicons can be visible beside the URL.
- Mobile Devices and Applications: When saved to the home screen on mobile, favicons appear as app-like icons.
Hope from the explanation and examples above, you have understood what a Favicon is. It is an icon used to help your blog in branding, enhance its visibility and user recognition.
If you want to design a favicon or want to let a graphic designer get it design for you, advise them to use a size of 16×16 or 32×32 pixels and save it in .ico, .png, .svg, or .gif. formats. You may see our guide on images sizes and dimensions for Facebook.
Why favicon is important
It is not compuslory though (without a favicon, your blog and website will still function). In case you still ask why a website and blog need a favicon, below are some reasons.
- Brand Identity: It contributes to your website’s brand. A favicon makes your site stand out in a multiple of open tabs or bookmarks.
- Professionalism: Websites without a favicon may appear incomplete or unprofessional, which can potentially reduce user trust.
- User Experience: A favicon helps users navigate their tabs more easily, especially when they have multiple open windows.
How to create a favicon
Before adding a favicon to your blog or website, you need to create (design) it because you can’t use your logo instead of it. Here’s how you can create it step-by-step:
- Size: The sizes for a favicon ranges from 16×16 pixels to 32×32 to 48×48 to 180×180.
- Format: The format is
.ico, but browsers accept.png,.svg, and.gif. - Design it simply: Favicons should be small. So, use a simple, clear image that represents your brand well. Many people use their logo Icon.
Below are top three tools to use to design favicons:
- Canva: Canva is an easy-to-use design tool where you can create a favicon from scratch using custom dimensions.
- Favicon Generators: There are many favicon generators, such as favicon.io or RealFaviconGenerator.net, that allow you to upload an image and create a favicon in different formats and sizes.
- Photoshop or Illustrator: You can design your favicon in these graphic design tools and export it as a
.pngor jpeg or .png or.icofile.
How to add a favicon to your website or blog
Now that you’ve created a favicon, it’s time to add it on your website. Here’s a step-by-step guide on how to add a favicon to a website or blog for different platforms:
1. HTML blogs and websites
If your blog is built using plain HTML, you can manually add the favicon using the steps below:
- Upload your favicon file to your website’s root directory (the main folder where your site’s files are stored).
- Add the following line of code to the
<head>section of your HTML document:
<link rel="icon" href="/favicon.ico" type="image/x-icon">
- If your favicon is a
.pngor any other format, modify the file type accordingly:
<link rel="icon" href="/favicon.png" type="image/png">
- You can have multiple sizes for different devices, such as:
<link rel="icon" sizes="32x32" href="/favicon-32x32.png" type="image/png">
<link rel="apple-touch-icon" sizes="180x180" href="/apple-touch-icon.png">
2. For WordPress blogs
If your website runs on WordPress, adding a favicon to it is simple and doesn’t require any coding. Below is how to do it step-by-step:
- Log in to your WordPress dashboard.
- Go to Appearance > Customize.
- Click on Site Identity.
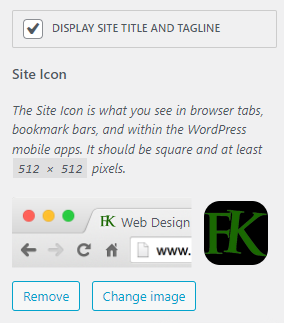
- Under the “Site Icon” section, click Select Image and upload your favicon. It should be at least 512×512 pixels for WordPress to accept it.
- Save and publish your changes. WordPress automatically handles the necessary code insertion.
3. For other platforms (Wix, Squarespace, etc.)
Different content management systems (CMS) have their own methods for adding favicons. Here’s a brief look at how to add a favicon to popular platforms:
A. Wix
- Go to the Wix Editor.
- Click on Settings from the top menu, then click Favicon.
- Upload your favicon image (Note that Wix recommends a 256×256 PNG).
- Click Publish.
You may see our expert step-by-step guide on the complete guide to website design (using Wix).
B. Squarespace
- In your Squarespace dashboard, navigate to Design > Browser Icon (Favicon).
- Upload your image (at least 100×100 pixels).
- Save the changes.
C. Shopify
- Go to your Shopify dashboard and navigate to Online Store > Themes > Customize.
- Find Theme Settings, and select Favicon.
- Upload your favicon image and save the changes.
4. For websites built with Bootstrap
If your site was built using Bootstrap, the steps below is how you can add a favicon to it:
- Upload your favicon to your website’s root directory.
- Add this code to the
<head>section of your HTML file:
<link rel="icon" href="/favicon.ico" type="image/x-icon">
- You can also include different favicon sizes for multiple devices:
<link rel="icon" sizes="16x16" href="/favicon-16x16.png">
<link rel="icon" sizes="32x32" href="/favicon-32x32.png">
How to test your favicon
Once you’ve added a favicon to your website or blog, it’s important to test it. Sometimes browsers cache icons, and your new favicon may not show up immediately.
Here is how to test your recently added favicon:
First of all, you have to clear your browser’s cache or open your website in an incognito to check your faviocn in action. If you are using cache plugin on your blog, you need to clear it too.
You can equally test your blog on multiple devices to ensure your favicon displays correctly. You may see our expert step-by-step guide on how to check your blog appearance on different devices.
Common mistakes to avoid
- Do not upload more than these sizes: 32×32, 48×48, and 180×180. It’s best to upload multiple versions of your favicon to cater to different devices.
- Do not use complex designs: Since favicons are small, complex images won’t translate well. Stick to simple and recognizable designs.
- Be careful with file paths: Ensure the path to your favicon in your HTML code matches the actual location of the file.
Conclusion
Hope this article has helped you know a favicon is, how to design it and how to add or upload it to your website or blog. Please comment below with how you are feeling righ now about this topic. You may also see our expert step-by-step guide on how to install plugins on the WordPress website.
If you know that this guide has helped you know how to add a favion to your blog and website, then please subscribe to my YouTube channel for more updates. You can also find me on Facebook.
Feel free to share this guide with others looking to improve their website’s appearance and user experience.


What is the solution for a favicon that disappears sometimes. I uploaded a fabicon to my blog some months ago but sometimes it disappears and the old one appears. How can I solve it please 🙏
I have found a guide on how to add a fav icon to my blog that is made with WordPress after countless times of rigorous researches. The reason why it has been good is that I use wrong file format.
Hi Dalhatu
Thanks for sharing your experience! It’s great that you were able to find a solution. Using the correct file format is essential for adding a favicon
My mentor. I appreciate this. I felt to visit your blog while I am bored at work this afternoon. Suddenly I saw this. It is great.
Hi Atuluku
I’m glad you found the post helpful! Thanks for taking the time to read it
I love this guide. Thank you sir for using it to discuss everything about favicon.
Hi Kellany
Thanks for reading! I’m glad you found the guide helpful
Thank you for sharing this idea. I love any update you drop as you directly go straight to the point without selfishness (getting affiliate commission).