
Hi guys. Welcome to this article. Today, we shall learn how to code a comment box or section using HTML and CSS on a website.
A comment box is an essential feature on a blog website. It provides a seamless way for your customers can get in touch with you. Through the comment box, you can also get feedback or comments about your products or services from customers.
If you are a beginner learning how to design a comment box using HTML and CSS, this article has got you covered. You may see our expert guide on how to use Div tag to style with CSS code snippets.
By now, I assume that you have known basic understanding of HTML and CSS. However, I will include screenshots to illustrate each step so that by the end of this tutorial, you will know how to code/develop and design a comment box using HTML and CSS.
HTML Code for making a responsive comment box on a website
Being a language used to create the structure of a webpage, HTML should be discussed first before CSS which is used to style and design the structure created by HTML.
So, here is the explanation about how a comment box is created on a website HTML code snippets and CSS.
The head section of the code contains the title of the page, which is “Comment Section“. Note also that you can give any title of your choice to it.
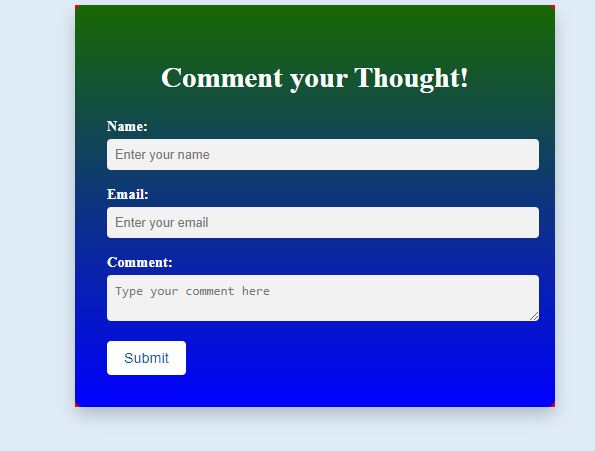
The body section of the code contains a container div that holds the comment box section. The comment box section is defined as a div element with the class “comment-box” and a gradient background color.
Inside the comment box, there is a heading element I named h2 with the class “comment-title” that displays the text “Join the conversation”. Below the heading, there is a form element that contains three form groups.
Each form group has a label element that describes the purpose of the input field, such as “Name” or “Email” which are defined as input with the type “text” and “email“, respectively.
There is also a text area element with the name “comment” that allows the user to enter a comment.
Finally, the code includes a submit button that sends the form data to the server for processing when clicked. This button is defined as a button element that I classed “submit-btn“.
Here is an HTML code for comment box.
Note that the HTML code starts by defining the document type as HTML and setting the language of the page to English.
It also includes some meta information, such as the character encoding used in the page (UTF-8) and the width of the viewport.
The code then defines a link to an external stylesheet named “styles.css” to style the HTML elements in the page.
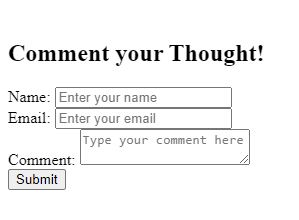
Here is the result of the HTML code above. It lacks CSS, design. Do you love it? You probably don’t like it!
CSS code snippets for styling a responsive comment section
Now that we have written the HTML code which structure our comment box, the next thing is styling it using CSS.
To style the comment structure using CSS, follow the steps below.
I shall set the body element background color to white.
I will set the container element to the maximum width that has a comment box section of 600 pixels and center it horizontally using the margin property. It will also be added with a red color at margin.
The comment-box element will be styled to have a white background, padding of 40 pixels, rounded corners of 10 pixels, and a box shadow effect in order to create a container with a clean and modern look.
I will also style the comment-title element with a large font size of 36 pixels, center its text, add margin-bottom of 30 pixels, and add a white text color.
The form-group elements will be styled to have a margin-bottom of 20 pixels. The label elements inside them will have a bold font weight, a font size of 18 pixels, and a white text color.
The input fields and textarea elements will be styled to have a width of 100%, a padding of 10 pixels, rounded corners of 5 pixels, no border, and a transition effect that changes the background color when the user interacts with them. The background color is set to a light gray shade with a font color of dark gray.
I will style the submit button to have a dark blue background color, white text color, a padding of 10 pixels horizontally and 20 pixels vertically, rounded corners of 5 pixels, a font size of 18 pixels, and a cursor that changes to a pointer on hover. The transition effect changes the background color on hover to a darker shade of blue.
The background will have a classed as ”gradient-bg” which will be used to create a gradient background effect that goes from a dark green (#196801) at the top to a blue at the bottom.
And lastly, the submit button inside will have a white background color, dark blue text color, and a 2-pixel solid white border. The transition effect changes the background and text colors on hover.
Once I have styled up the HTML code above, we will have a professional responsive comment box on your website.
Now, remember that you must create a CSS file with the name “styles.css” and paste the given codes into your CSS file.
Here is the CSS code snippets for the explanations above.
Adding this CSS code to the HTML provided earlier in this article, you will have this result:
I hope that you have learned how to create a comment box using HTML and CSS by following this step-by-step guide.
Did you find this article helpful? Let me know in the comment section.
Note that you can also create more advanced comment sections on your website using Python, MySQL and lot more. You can also install a plugin to do it for you. But plugin’s files tend to occupy your website hosting space, thus, web developers like to code it to save web host space. You may contact us for your website development and design. We will code it for you.
Conclusion
A well-designed comment box is one of the ways to improve user engagement on your website. I am sure that by implementing what you have learned in this tutorial, you can create a comment section on your website.
If you know that this article has helped you know how to code a comment section or box using HTML and CSS code snippets, then subscribe to our YouTube channel for more updates. You can also find me on Facebook.


Please can you talk more about how to make commenters name not to link to the website they provide through commenting process? Because some spammers want to get backlinks, thus the comment even if it’s not necessary in order to add their link.
I must appreciate you for your dedicated efforts towards the creation of this article.
I have a question and it’s that how can a comment box be coded that it should contain website URL of the commenters input section but when they enter their website, their name should be linked to their website address on a blog because this is what many spammers use to get backlinks. There’s one of my blog that is full of spam comments that I want to remove.
Thank you Sir 😐 for this guide. I liked how you have elaborated everything in details. Thank you and may you be pleased to be pushing out the content like this to us here.
Glad you found it helpful.
Glad you liked the article.
I like how you take time to explain everything in detail on this blog. From the couple of your article I read so far, I must give kudos to you. Thank you Sir for using this platform to educate people.