
Do you want to know how to install a WordPress on cPanel so that you can create a website or blog?
While WordPress is free and open-sourced, before you can have access to it, you need to install it. And in this article, I will show you step-by-step guides on things to do to be able to have access to the installation of WordPress.
Now, let’s start
Why should you install a WordPress?
You might have heard that WordPress is free and open-sourced, right? Then why a person can’t just go to the internet and install it? Since it doesn’t happen that way, here, we shall explain why and how to install it step-by-step.
Note: we are referring to a self-hosted WordPress which is wordpress.org where you would need to buy a domain and hosting because there are two platforms of WordPress; wordpress.com and wordpress.org. For more information between wordpress.com and wordpress.org, please read this post.
The type of WordPress that everyone can easily download on their device without installing it via cpanel is wordpress.com (it is free; doesn’t require you to buy hosting and domain), but it has so many disadvantages, some are it prevents you from designing your website theme, installing plugins on your website, and sadly, you will can’t monetize your website.
If you want to know how to properly install WordPress for your website and have full control over it, then this article is for you.
Note that most WordPress web hosting companies nowadays have an automatic quick-install WordPress feature. If your own web hosting company doesn’t offer this, then simply follow the processes below which will at least take less than five minutes. You may see our expert guide on the best WordPress shared hosting companies in 2024.
Requirements to install WordPress
To install WordPress in order to create a website, you need a domain name and a web hosting company.
One of our hand-picked and client-friendly companies, FastComet, an Indian-based WordPress web hosting company will give free domain names when you buy hosting on any plan from them. They have all that beginners need to create any type of website with WordPress.
Most importantly, they have 24/7 customer care support service teams, they provide fast-loading web hosting, you can choose from many domain extensions on their server, etc.
How to install WordPress on your domain
Now that you have bought hosting and a domain name, let’s show you how you can install WordPress.
FastComet is among the companies that automatically install WordPress on your domain name when you buy hosting from them.
If you don’t want to manually install WordPress on your domain, feel free to buy your hosting from FastComet, follow the steps below. Perhaps, if you have already gotten web hosting from another company that does not offer an automatic WordPress installation feature, then follow the guide below.
Step one: go to your Cpanel
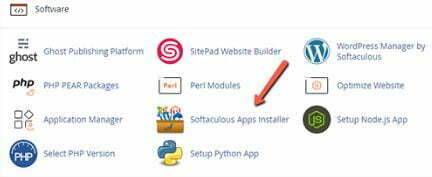
1. Before you can install WordPress, you must get access to the Softaculous Appa installer which is located under cPanel. How to get access to a cPanel, you ask right? You may see our expert step-by-step guide on how to get a cPanel.
2. After that, you will see WordPress at the top left side of the page.
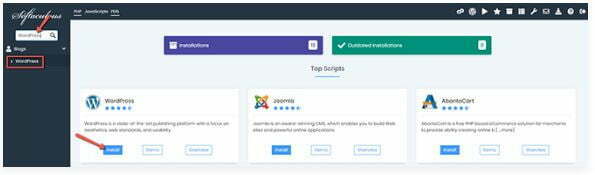
3. The next thing you would do is click “Quick Install”

Step 2: fill out the pre-installation set-up
Next, the pre-installation setup below will appear.
- Installation URL – The actual domain or subdomain that you want to install WordPress for. You can choose to install WordPress in the root directory of your domain, such as blog.domain.com.
- Directory – Your WordPress website should be located in the named subfolder. You must leave this option empty if you want WordPress to be installed directly on your domain or subdomain because it is, by default, set to “WP” at the front of your domain name, for example, www.domain.com/wp/
- Choose the WordPress Version of your choice – When selecting a WordPress version, it is good to choose the latest version for security and fast-loading performance.
- Admin Username – This is where you will enter the username you would like to use as an admin.
- Admin Password – This is referred to as the password for the admin user. Please enter a very strong password here.
- Admin Email – Here, you would need to enter the email address on which you will receive notifications regarding your website.
- Now, you can click the “Install” button.
Step 3: fill out the custom pre-installation set-up
Below are some other things which you would need to do in the next section. Please note that most of them are not really important at this moment as you can change them after successful installation within your dashboard.
However, you can follow these guides for more:
- Protocol – You can choose any protocol you want to use. But, importantly, if your site has SSL and HTTPS, then select https:// or https://www. as protocol.
- Site Name – This is when you would need to enter the name of your WordPress website. Note: you can easily change it from your WordPress admin area after installation.
- Site Description – This is referred to a short description of what your website is all about.
- Select Language – This entire section contains a single field related to the language which you would like your WordPress to use. The list of supported languages is quite big, and most probably, you will find your native language there.
- Classic Editor – Note that this type of editor is out-fashioned. However, for users wanting the pre-Gutenberg editing options available in versions after 5.x.
- Disable Update Notification Emails – Turn this option off if you want to disable the notifications that Softaculous will send to you when an update for your website is available.
- Auto Upgrade – This option allows the Softaculous app installer to automatically update WordPress for you anytime the new updates has been released.
- Auto Upgrade WordPress Plugins – Checking this option will allow automated plugins to upgrade upon a platform version update.
- Auto Upgrade WordPress Themes – Ticking this checkbox will enable automatic themes to upgrade when the installation script is updated by the developer of your theme.
- Automated Backups – This option is for configuring an automatic backup service for your WordPress-based website. The available backup options are related to the frequency they should be performed.
- Backup Rotation – This is very important to check in on because it is the number of backups that would be automatically kept for your website.
Step 4: begin the installation process
Now, you can start to begin the installation process when you have made all the settings of your choice or based on your website requirements. To begin the installation, simply click the “Install” button at the bottom of the page.
After that, the installation will begin loading from 0%. Please don’t close the window throughout this process until the progress bar hits 100%.
If you did follow these procedures, then congratulations as you have newly installed a WordPress using Softaculous from your Cpanel.
Conclusion
Hope this article has helped you how to install WordPress using the Softaculous app installer from your Cpanel.
Please share it with your friends and remember to subscribe to my YouTube channel for more important updates. You can also find me on Facebook.
And remember that we provide WordPress installation service for free. In case you find these procedures techie, you can contact us.
Have you successfully installed WordPress on your domain? If not, then what is the problem are encountering? Let us know via the comment section.

Sir please how can I know if a plugin that I want to install is compatible with my website? I have downloaded one plugin from WordPress.org/plugins and it’s saved in .zip on my device (computer), I want to install it via cPanel but I want to check first whether it’s compatible or not.
Please can you help?
Has anyone on this platform used Joomla before? I need a tutorial about it just the way you teach everything here. Please help me.
First of all, if you have used Joomla before, then between it and WordPress which one is harder?
Please 🙏 I need an answer to this question; I downloaded WordPress from their website, WordPress.org three weeks ago. But it appears to be a zip file in my computer. How can I launch it? I hope I can also use that to create and manage my small business website. Please explain sir.
The WordPress file you downloaded is a good one. Glad you downloaded it from a good source. That .zip file should be uploaded via your cPanel’s file manager. For more information, please see our guide on how to upload website files via cPanel’s file manager. Hope this reply is helpful.