Do you want to know how you can transfer your WordPress.com blog to WordPress.org in order to get access to all premium features of WordPress?
WordPress.com is a free version software that allows people to create a website for free, hence, many beginners are happy to start with it. However, after some times when they need specific feature(s) on their website, then they are restricted to add.
Different features such as installing plugin, editing the file of your theme, etc. are some common features that many people want to transfer their website from wordpress.com to wordpress.org which offers premium features.
In this step by step guide today, we shall show you how you can transfer from wordpress.com to wordpress.org.

Why transfering from wordpress.com to wordpress.org?
Every webmaster who is using WordPress.com to manage his/her blog is restricted from using premium features. However, it is very simple to start a blog with because it is free, you don’t need to know any programming code.
The only disadvantage of WordPress.com is that it has a lot of limitations, example, you won’t be able to monetize your blog post, you will can’t install plugins and sadly third-party ads will be displaying to your readers while you don’t have any commission from it.
As a result of these limitations, wordpress.com users intend to transfer to the self-hosted WordPress.org platform.
It is very, very important to use WordPress.org to create any of your blog and website because they give you complete freedom to control all of their features that you like to use.
Hope you have known the reason why people decide to transfer from wordpress.com to wordpress.org. Now, let’s look at how you can properly do that.
How to properly transfer from wordpress.com to wordpress.org
Step 1: expert data from wordpress.com
To transfer from wordpress.com to wordpress.org, you first of all, you need to export all of your data in one file. And to do that , you need to sign in to your WordPress.com site and go to your account dashboard.
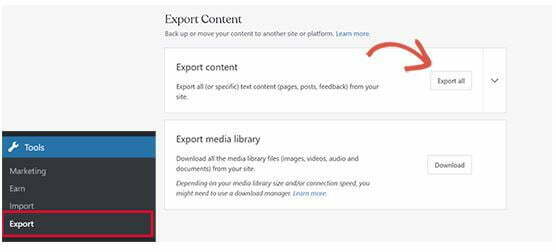
From the left column, click on the Tools » Export menu and then click on the ‘Export All’ button.
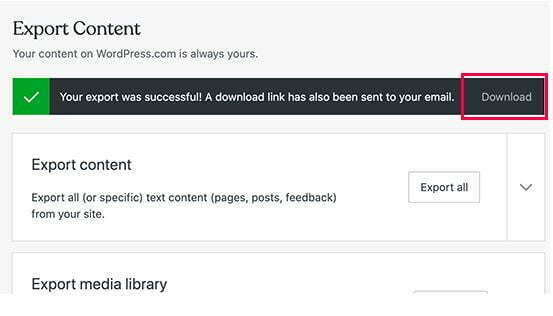
Exporting your data allows you to export your WordPress site. Once the file is ready, a download link will appear to download the zip file on your device.
You will also receive email from WordPress.com which contain your files.
The file that you just downloaded contains your posts, pages, images, comments, custom fields, categories, tags, navigation menus, and other data. It is a .zip format file, hence, you can unzip it to see all the files.
Step two: set up wordpress.org
In this step two, you need to set up a WordPress.org.
You can read this guide to know how to install WordPress.
To install WordPress.org, you need a web hosting. We help people know how to buy hosting and get a domain for free.
Follow the guides we shared here to know how to install WordPress. When you have installed successfully, then continue to import your content into your newly self-hosted WordPress.org website.
Need best WordPress hosting?
Buy your WordPress.or web hosting from FastComet and get your favourite domain name for free. Note that buying from them using our link earns us an affiliate commission without any disadvantage to you.

FastComet
FastComet is one of the best web hosting and domain name registrars in 2023 that provides fast-loading web hosting services. Their customer care support teams work 24/7 to make sure their customer problems are at their top priority to fulfil what their tagline is.

HostMarda
Being our web hosting partner, HostMarda offeres discounts on cPanel Shared Hosting for our fans. As a beginner like you, we advise you to choose HostMarda. They specialize in shared and cloud hosting, emphasizing reasonable costs and excellent customer service.
Step 3: import files to your new WordPress
Now, it is time to import files that you downloaded from your WordPress.com website to your newly self hosted WordPress.org website.
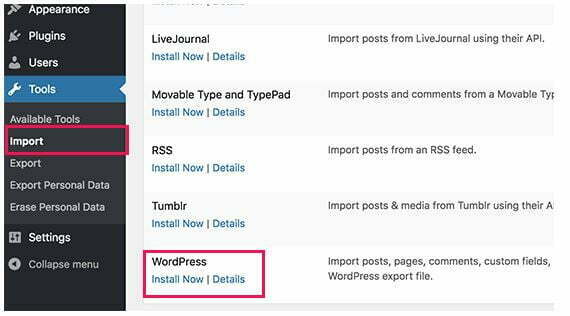
To do that, login to your WordPress.org website’s admin area. On the left sidebar menu, visit the Tools » Import page and click on the ‘Install Now’ button below WordPress.
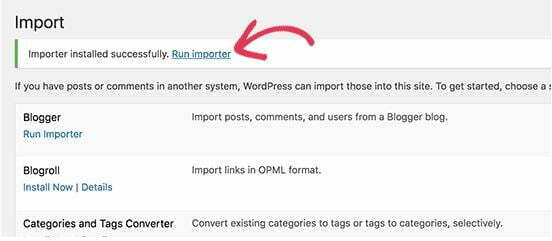
Wait for WordPress to install the importer for you. When the time is right, you need to click on the ‘Run importer’ to continue.
You will now be taken to a page where you need to upload your WordPress.com XML file that you downloaded in step 1.
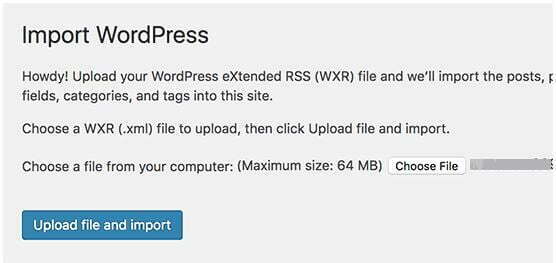
Your file size must be larger than 2MB. And WordPress does not allow the import of a larger file. To import your files, you have to contact your web hosting company to increase that limit. If you don’t want to contact them, then you can split your file by using a WXR file splitter.
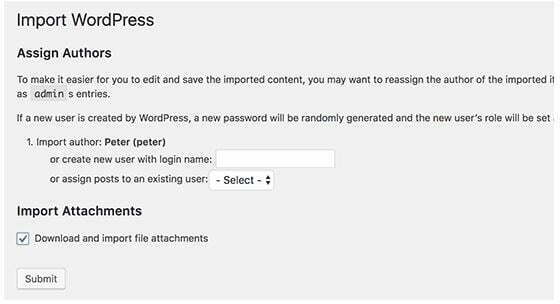
You can assign the imported content to an existing user or create a new user. It is very important that you check the option to import file attachments so your image files are imported properly.
Step 4: set wordpress.com to private
Setting your wordpress.com to private is the best option for you if you don’t want to redirect your old users to your new site.
To do that, visit WordPress.com dashboard. Click on Settings » General menu From the left menu. Now, scroll down and click ‘Privacy’ section and check “Private”.
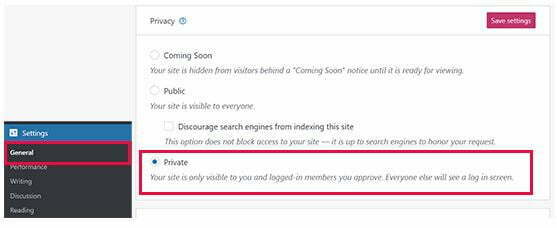
From now on, your WordPress.com blog will be private, it will only be visible to you and other logged-in users that you approve.
However, you can redirect your wordpress.com users to your new blog by following the next step if your wordpress.com is established and has already got a traffic.
Step 5: redirecting people to your new website
In the world of blogging, redirecting, as its name implies is directing people from one website to another website with the aid of 301 header. Experts say that it helps to keep search rankings.
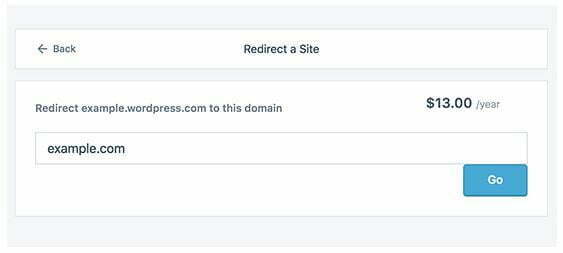
You can do that by editing the .htaccess. And on wordpress.com, you don’t have access to that. However, WordPress.com offers a paid upgrade feature called, Site Redirect, which provides redirecting functionality for $13 per year.
If you want to redirect people from your wordpress.com to your new self-hosted wordpress.org, simply login to your WordPress.com blog’s dashboard and click on the Manage » Settings menu item. Under the ‘Site Address’ option, click on the ‘redirect’ link.
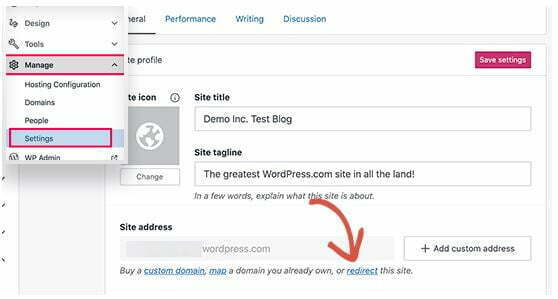
On the next page, you will need to enter the name of the domain which you want redirect visitors to. Then enter your new WordPress.org domain name and click on the go button.
After you have made the payment for redirecting visitors from your wordpress.com website to your new self-hosted website, wordpress.com will add a 301 redirect and search engines to your new site.
You can do this redirect for 2 years so that your wordpress.com users can be familiar with your new domain name.
Related posts
Read the related posts below about WordPress.
-
How to make money on WordPress blog -
How to set up WordPress for your blog for free