Website development is an exciting journey. However, occasionally, things go contrarily as planned which leads to a breakdown of functionalities that requires you to reset everything to default. So in this guide today, I will show you how to reset a WordPress website or blog to default.
If you are in a situation where your WordPress-powered website is no longer functioning normally as it was created due to code experimentation or other issues, a reliable solution is to reset it to the default. In this article, we will show you how to reset a WordPress website by using one of the most popularly-used plugins; WP Reset and via cPanel.
You may see our expert guide on how to design a WordPress website step-by-step. So let’s get started.
How to reset a WordPress website to default
Before we go into the details of the technical side and the practical implementation of resetting your WordPress website, it’s good to know why you should have to reset the WordPress website and start from scratch.
To begin with, it is important to understand the purpose of a resetting action. When a WordPress website is reset, everything will be lost except you created a backup of it the first time. So when you have reset your WordPress website, you will start over with a fresh website just like when you installed it on your cPanel. You may see our guide on how to install WordPress on your domain via cPanel step-by-step.
In this guide today, we shall show you two methods of resetting the WordPress website so that you can start everything with your website from scratch.
Before you follow this guide, please make sure that you have backed up your website as all the settings and content you have created on your website before (posts, pages, comments, database tables, media, custom post types, etc.) will disappear. You may see this guide on how to back up a WordPress website step-by-step.
However, there is a feature in the plugin we are going to reset our WordPress website called Snapshot that can be used to create a backup for your website, but that is not recommended. Instead, you may use a plugin that is specifically made for website backup. Check our website for how to back up the WordPress website. You can also contact your web hosting provider to keep a backup of your website for you.
Now, let’s get started with how to reset your WordPress website.
Method 1: using a plugin
The name of the plugin for resetting WordPress websites is WP Reset. It allows you to reset and restore the default settings of the website database. I hope you know how to install plugins on WordPress. If you don’t, then you may see our expert guide on how to install plugins on the WordPress website.
So, let’s move straight to start showing you how to use the WP reset plugin assuming that you have installed and activated it on your WordPress website already.
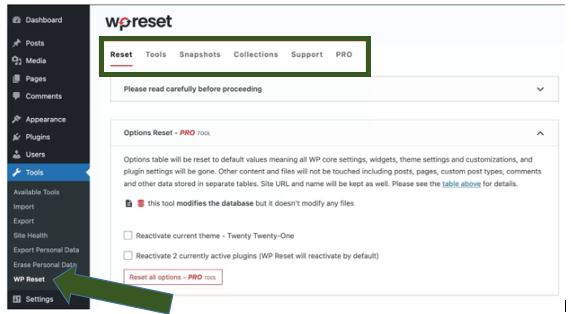
Step 1: Navigate to the Tool menu on your WordPress dashboard and find the WP reset menu.
Before you continue, you may need to back up your website. Let’s do that by using the Snapshot feature in the WP reset plugin.
Step 2: Using the snapshot feature in the WP reset plugin
A snapshot is “a copy of all WordPress database tables, standard and custom ones, saved in the currently used database“, says WP Reset.
It is advised to use this feature before performing any manipulation with one of its dedicated database tools.
If you want to use the WP reset snapshot feature, you can find an option in the “Tools” tab:
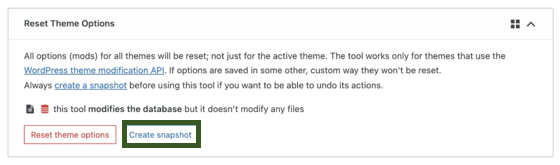
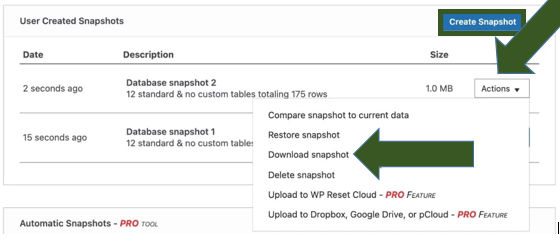
Remember to save your changes before any manipulation. That is, after creating a snapshot, then download the backup of your database.
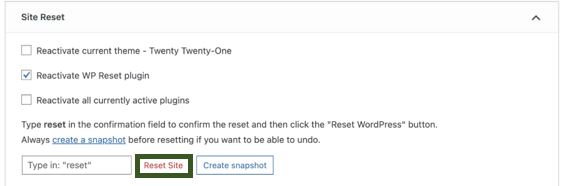
To finally reset your WordPress website, go to the “Reset” tab, then “Site Reset”. You will have 3 boxes to check/uncheck:
- Reactivate the current theme – Twenty Twenty-One (or another one depending on the version of WordPress you will be using).
- Reactivate the WP Reset plugin.
- Reactivate all currentlyReactivate all currently active plugins.
It’s up to you what you want to do. If you want to go back to a fresh installation of WordPress with the default settings, simply leave the checkboxes unchecked (just choose “Reactivate WP Reset plugin” if you want the plugin to be reinstalled after the reset).
After resetting, please note that the following items will be permanently deleted:
- Posts
- Pages
- Custom post types
- Comments
- Media
- Users
- WidgetsWidgets
- TransientsTransients
- Settings and options (of WP, theme, and plugins)
- The contents of the tables are prefixed with the one defined in your
wp-config.phpfile.
Step 3: Resetting the WordPress website
Now that you have gotten a backup of your website, all you have to do is reset the site. To protect the user, WP Reset has a two-step protection mechanism:
You must enter the word “reset” in a dedicated box. Once this action is done, you can reset the site by clicking on the dedicated button. A highlighted window will ask you to confirm again: be careful, no return is possible afterward.
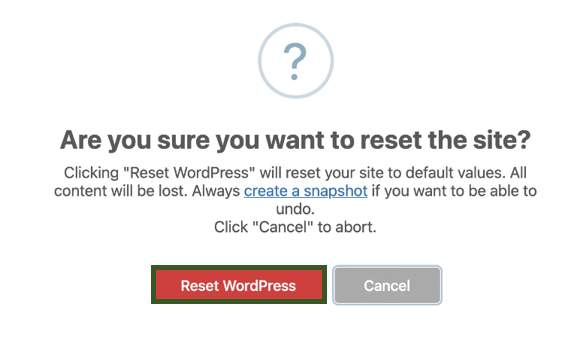
Thanks to the double consent, so to speak, you are sure not to delete your site inadvertently, which is very convenient. The reset operation takes a few seconds.
Once it’s complete, you’ll be redirected to your dashboard, where a message will tell you that:
- The site has been reset to default settings.
- The user who performed the reset (“admin”, in this example) has been restored with the unchanged password.
If you take a few moments to look at your different menus, you will notice that some items are still present. Plugins and themes are present but they are not active. The title of the site, its URL, and the default language are the same.
You will also see that the files have not been affected. However, be careful: the uploads folder, which stores all your media, is always full! And this, even if the media have disappeared from your media library.
Congratulations! Your site has been reset, and everything went well.
Now, let’s look at the second method on how to reset a WordPress website to default.
Method 2: via cPanel
In this method, we will show you how to remove the WordPress installation on your website, and then install fresh WordPress on it so your new website has a default WordPress installation (new). All you have to do is log in to your cPanel and follow the steps below. You may see our expert guide on how to get a cPanel (step-by-step).
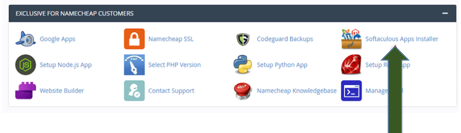
Step 1: Log in to your cPanel and navigate to WordPress (Softaculous).
This will help you to remove an installation of a script. (for eg. To remove an installation of WordPress just follow the steps given below to you)
1) Click on the Red Icon button.
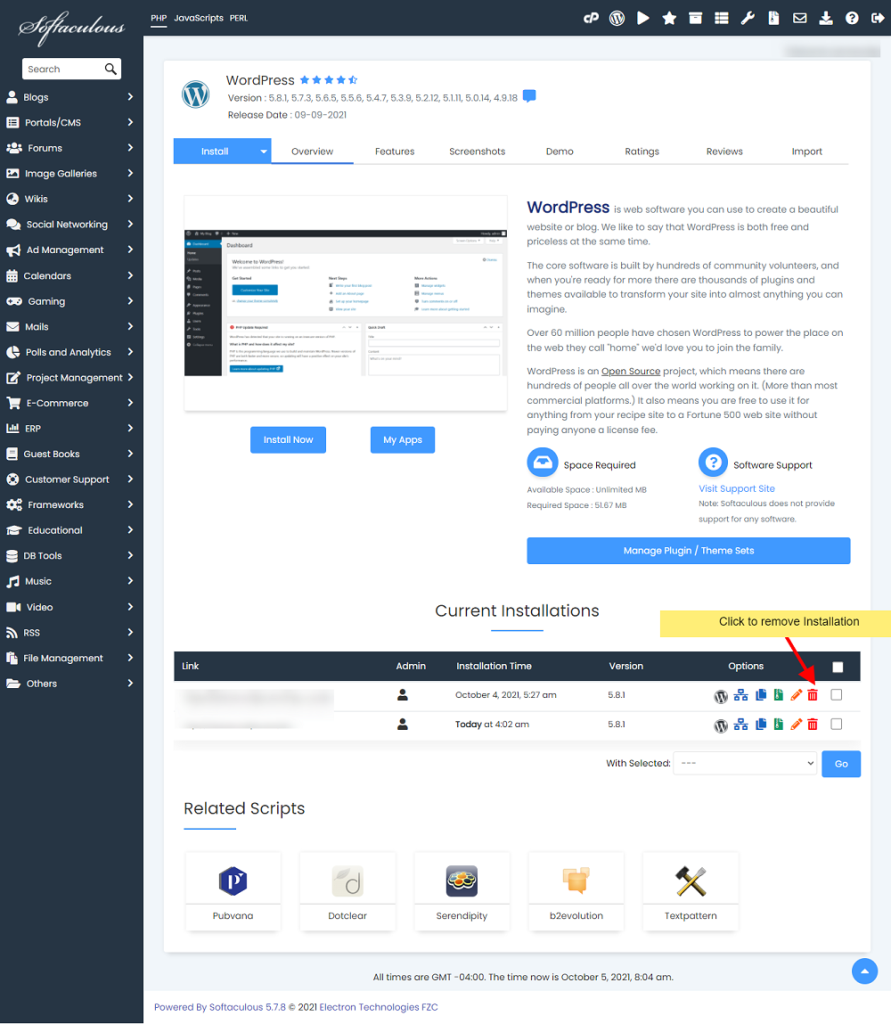
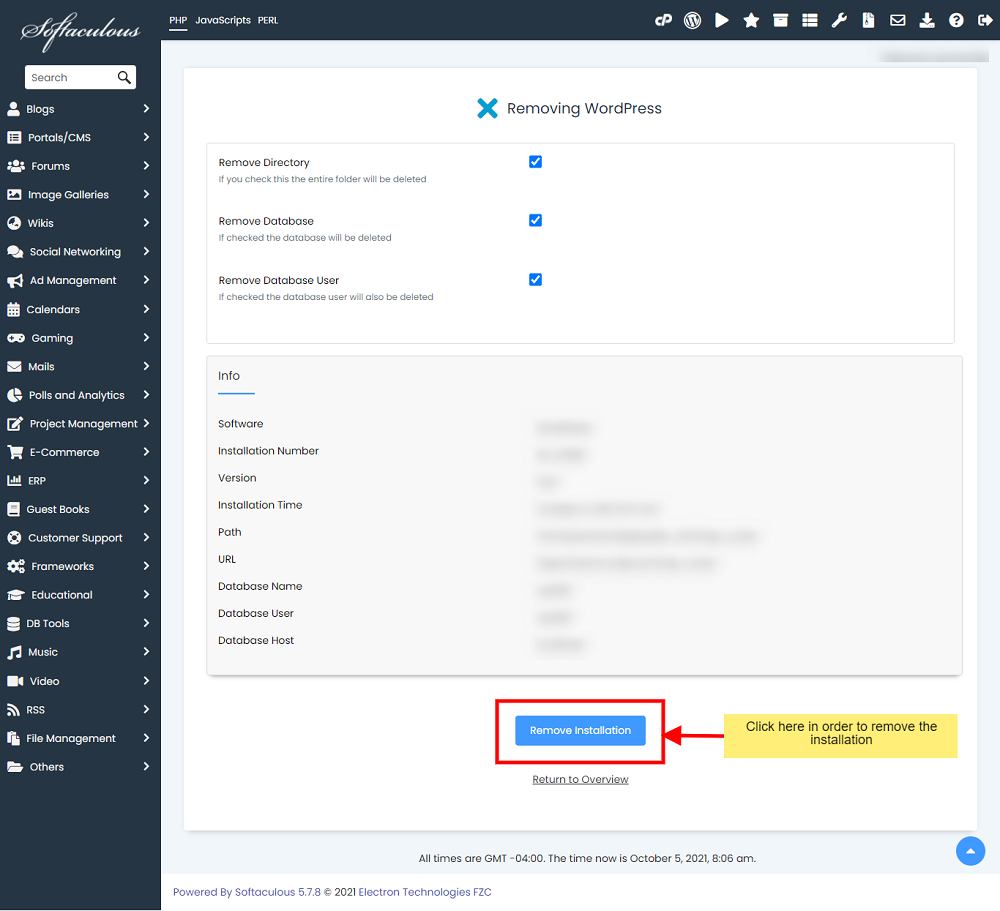
2) After clicking on the Red Icon button you will be redirected to the page where you can remove an installation. If you wish to keep the Installation Directory, Database, and Database User for that Installation uncheck the respective boxes. Now click on the Remove Installation button to remove the installation.
Now that you have uninstalled WordPress from your website, let’s see the second part of this method by reinstalling new WordPress via cPanel (Softaculous).
Step 1: In your cPanel, navigate to the Softaculous Apps Installer and click on it. In some cases, it might be simply named Softaculous.
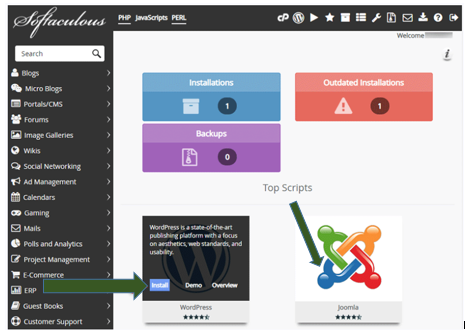
Step 2: Hover over the WordPress box and click on the Install button.
Step 4: Go through the Softaculous setup settings.
What you see in the screenshot are the default settings, so don’t follow those. Follow the instructions I wrote below.
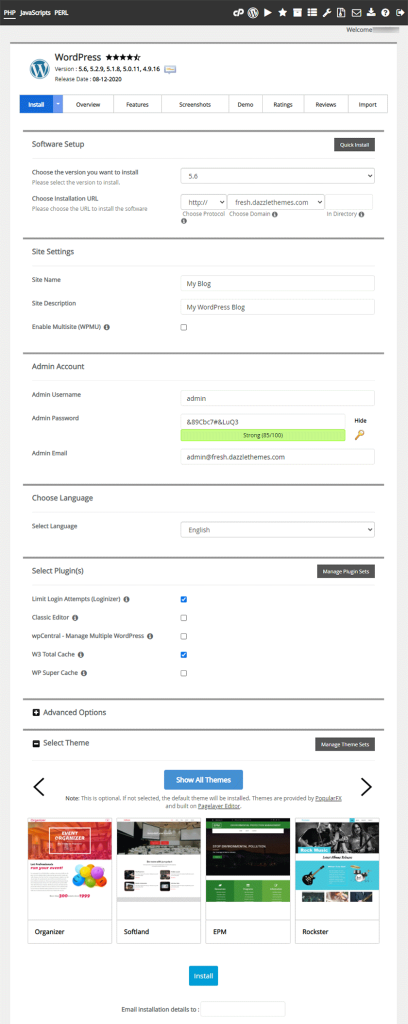
Step 5: Software Setup
- Choose the version you want to install – Normally, it automatically selects the latest WordPress version. You can check the latest WordPress version yourself, to be sure. And you can always update WordPress once you’re in your dashboard.
- Choose Installation URL:
- Choose Protocol – As mentioned above, I strongly recommend having an SSL certificate installed on your domain before installing WordPress with Softaculous, so you can select the
https://Protocol, instead of the defaulthttp://. So, if you have an SSL certificate, selecthttps://; otherwise, leave the defaulthttp://. You can also choose if you want thewwwornon-wwwversion (e.g.https://example.comorhttps://www.example.com). - Choose Domain – In case you have more domains or subdomains, choose the one where you want Softaculous to install WordPress on.
- In Directory – Leave blank if you want WordPress to be installed on your root domain (e.g.
example.com). This means that your homepage will be on your root domain, not in a subdirectory, such asexample.com/wordpress/whatever you might choose. In most cases, that should be left blank.
- Choose Protocol – As mentioned above, I strongly recommend having an SSL certificate installed on your domain before installing WordPress with Softaculous, so you can select the
Site Settings
- Site Name and Site Description – You can edit those in your WordPress settings when you start building your website. Don’t focus on them now. You can leave the default values.
- Enable Multisite (WPMU) – Multisite allows you to have multiple websites that share a single WordPress installation. Don’t enable it if you’re not familiar with this feature. You can always enable it after installing WordPress if needed.
Admin Account
- Admin Username – For security reasons, don’t ever use
adminas a username. So, change the default username with something else. - Admin Password – Choose a strong password, the type that you can’t remember by heart 🙂 .
- Admin Email – This email address will be used to receive notifications from your WordPress website. It can also be used, by default, when you add a contact form in WordPress. You can also use it to log in, instead of the username.
Choose Language
- Select Language – The language you select here will be used to translate your dashboard and the front-end parts of your website that are handled by WordPress. Some themes and plugins might automatically make use of this feature as well.
Select Plugins – Unselect whatever is selected by default. You can install plugins in WordPress after you’ve set it up. You may see our expert step-by-step guide on how to install plugins on the WordPress website.
Advanced Options – Leave the default settings. Or, you could enable Automated backups, but I think it’s safer to use something like UpdraftPlus to back up the WordPress website to remote storage.
Select Theme – Don’t select any. You can easily install or upload themes after you’ve finished installing WordPress with Softaculous.
Email installation details to – If you want to receive the installation details, such as the login information, add your email address there.
Once you’re done, click the Install button.
Step 6: Wait for the installation process to finish. After it’s completed, you should see a success message, along with the URLs to your domain and login page.
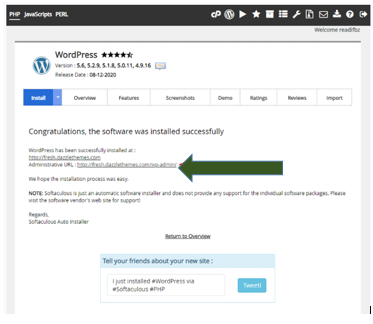
Click the Administrative URL to go to the WordPress login page. If you’re not automatically logged in, add the username (or email address) and password that you added in the Softaculous setup process.
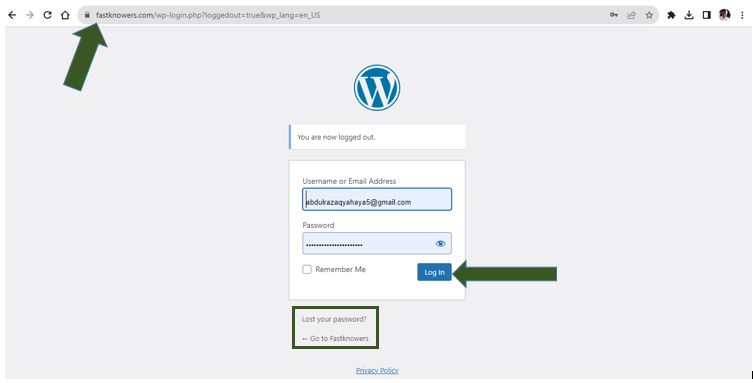
After logging in, you’ll see your WordPress website is now reset, no plugin, no post, no page, and many more.
Conclusion
In conclusion, you should be advised to always back up your website and also choose a web hosting company that keeps their customer’s website backup every 24 hours. You may see our top handpicked best shared hosting companies in the world in 2024.
Hope this article has helped you know how you can reset a WordPress website to default. If yes, then please subscribe to our YouTube channel for more updates from us in the future. You can also find me on Facebook.


I want to change my website niche. Hope resetting it will switch off everything to default? Please do you have any advice for me?
Thanks
Thank you for this update sir. I really appreciate your work. 👍
I appreciate your work very well sir. I could be able to reset my website to default after tempering the theme code of it as I was following the tutorial my friend shared to me 😃
Thank you sir for your help in this platform. Please my question is if I reset my WordPress setting to the default, then what would happen to my content? I want to know more before I start. I tempered with my website customizer setting and things changed. So I need to reset it. Thanks.
Sir, please answer my question. I have a website that is powered by WordPress. The website files are hacked, I lost my organic traffic and I always get emails from my hosting registrar that my website is sending spam messages to people which I don’t do.
My question is; will resetting WordPress to default fix everything (getting back my organic traffic and stop receiving email from my hosting registrar)?
Thanks