After you have successfully created your WordPress blog, the next thing you would think about is how you can write post or content.
Well, blog post and page are very important. People will not visit your blog to see its design. What they will really want is how your blog can help them.
You can start helping people by creating helpful posts on your blog from day one.
Hope your blog won’t slow down as a result of high volume of visitors if you used best recommended WordPress web hosting and domain name company.
Today, we shall show to you step-by-step guides on how you can create or write your first blog post on WordPress.
Our Tools

Use our tools
We tools to create anything we use. Explore them below.
How to write post on your WordPress blog
1. Perform keyword research
The first you need to do when you want to create any post on your WordPress blog is performing a keyword research. Performing keyword research helps your posts rank higher in Google search and get more traffic.
Keyword research is a very essential guide for content creators. SEO experts reveal that it’s good to use 75% for keyword research and the rest of the time for creating content.
For more information, feel free to read our expert guide on how to do keyword research on a WordPress blog and website here
2. Log in to your WordPress dashboard
To write your first blog post, login to your WordPress dashboard, click on the Posts » and Add New menu.
You will see an editor area where you can start write your first blog post.
3. Add Title and Content Blocks
The WordPress block editor comes with a clean writing interface. At the top, you will enter your post’s title.
To add content, you need to add a block. There are multiple add block buttons on the screen that you can click to select and add a block.
You can use a keyboard shortcut by typing / to search and add a block if you don’t want to use a mouse to click on the button.
Note that all content elements are wrapped in a block. You will see a blocks for all the common content items including paragraphs, columns, images, galleries, embeds, shortcodes, widgets, and more.
You can also install some WordPress plugins to add their own blocks such as contact forms, SEO, etc.
4. Add image and media file
Media files such as image, video and audio make people easily understand. Thus, you need to at least add any of image or video in your blog post.
Thankfully, you can seamlessly do that without writing any programming code. Just follow the steps below.
To display image at a particular place, simply select the image block and upload or select from your media library the image you want to add.
You can even display image and text in a designed way like wrapping text around the image by using the ‘Media & Text’ block.
Most interestingly, you can use a Gallery block to display images in rows and columns with a grid layout.
Simply add the Gallery block and then upload or select the images from your WordPress media library.
You can also embed video in your blog post on WordPress.
Without wasting time to select video blog, you can just copy and paste the video URL to a paragraph block as WordPress will automatically convert it into a video embed block.
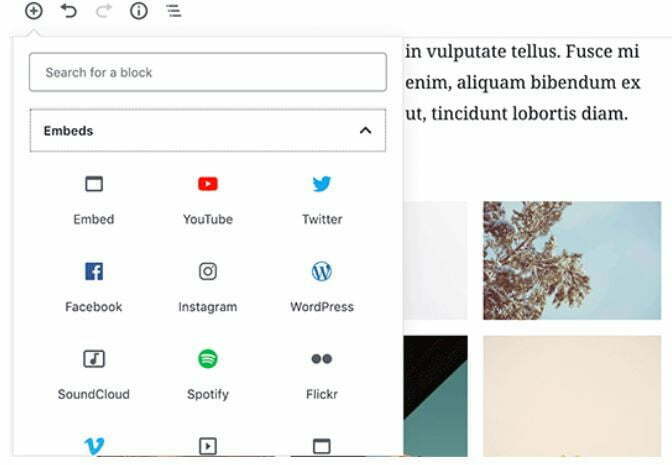
Please don’t upload videos directly to your media library on WordPress as it slows down your website and can even crash your WordPress hosting server.
Instead of that, you should simply upload your videos on YouTube and then embed its URL in your posts.
Need help with choosing the best WordPress web hosting?
Check out FastComet web hosting. Because they are our current web hosting registrar. You may also see our guide on the top best WordPress shared hosting companies.

FastComet
FastComet is a Web hosting company that provides fast loading, 24/7 customer care support, and affordable prices.

HostMarda
HostMarda is a powerful Web hosting company that has a 24/7 relentless customer care support team, affordable price, and no hidden.
5. Adding featured image
Featured image is very important on any WordPress blog. It is a thumbnail of the article. They’re displayed on your blog on single posts, blog archive pages, as well as on the homepage of news, magazine, and blog websites.
While you are writing a blog post, you will find the option to add a featured image to your post in the right column under the Document settings.
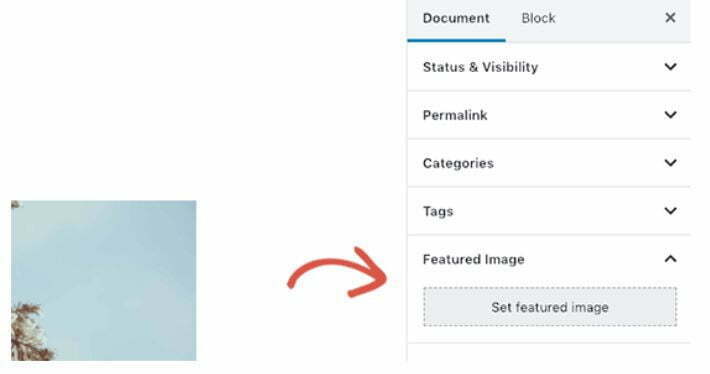
To add featured image to your post, simply click on the ‘Set featured image’ button and then select or upload the image you want to be used as the featured image.
6. Organizing your post
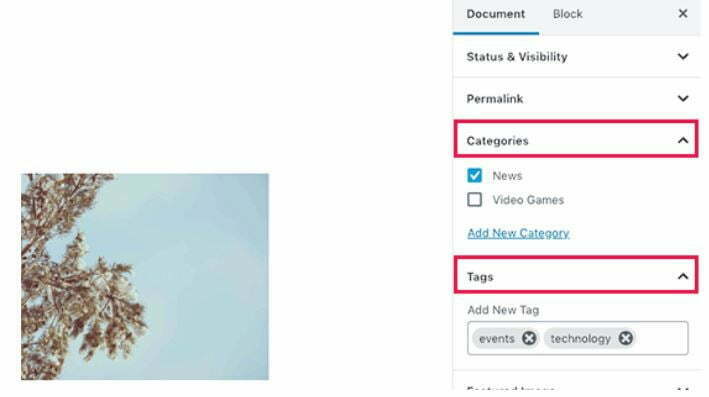
While you are writing, you will see several sections such as Categories and Tags. You can use these to organize your blog posts into category, topic and tag. Professionally organizing your posts increases their SEO.
Find the categories and tags section at the right-hand column, under the Document settings.
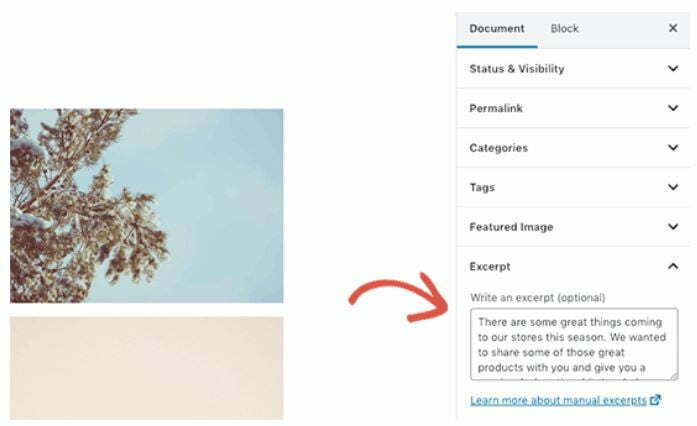
7. Adding excerpts
Excerpt is the summary of a blog post. It simply in brief introduces or shows what your article is all about.
Many WordPress themes automatically generate the excerpt from the first few lines of your blog post.
However, you may not want this automatic excerpt. In that case, you may want to manually add an excerpt.
You can do so by adding it in the excerpt box located under the document settings column on the right.
8. Turning on/off the comments
By default, WordPress comes with a built-in commenting system. This means that people will be allowed to leave comments on your post.
However, you can turn off comments for individual posts from the Discussion tab under the Document section if you don’t want people comment on a particular post.
9. Changing the post permalink
The permalink of a WordPress blog post is its URL. By default, your post’s title is usually used as the permalink.
However, you can change this according to your own pace.
There are two ways to change your blog post permalink on WordPress.
One is clicking on the post title, and you’ll notice the option to change the permalink above the title field. Another second method is changing it from the Permalink tab under the document settings column.
10. Changing the author
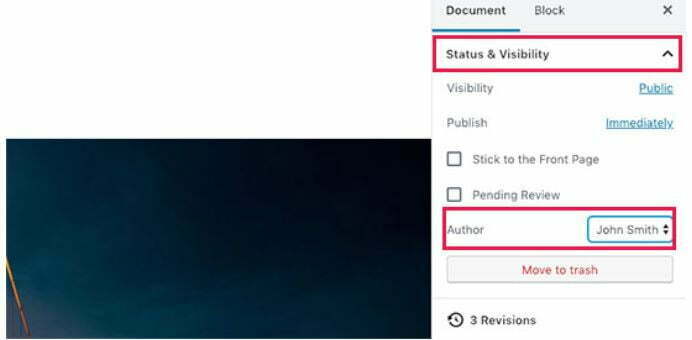
Another important thing you can change when publishing post on your WordPress blog is changing or assigning an author. This is good for your blog if it is a multi-authored.
To change author for your post on WordPress, find the option under the ‘Status and Visibility’ tab in the right column.
11. Publishing post
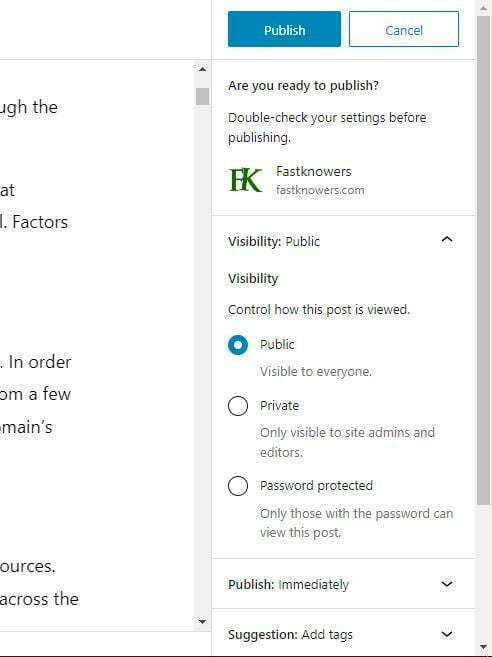
The screen where to write blog post on WordPress is divided into two left and hand columns. The left column is where you write content, and the right column contains the settings including publishing options.
Thus, to publish your post, simply look at the right column.
At the right hand column also, you can:
1. Save draft link allows you to quickly save changes you made to a WordPress post. The editor will also automatically save your changes as you write.
2. The preview button will open a live preview of your post or page in a new browser tab.
3. Once you are done editing your post, you can click on the Publish button to make your post go live.
4. WordPress gives you a few options to control the visibility of your post. The default option is ‘Public’ but clicking on it will show you options to make a post private or password protected.
5. You can schedule your posts to publish later or even select a past date.
Once you’re done writing, click on the Publish button to make your blog post publicly published.
Frequently Asked Questions
How should you write a blog post on WordPress?
- Log in to your WordPress via www.yourwebsite.com/wp-admin/
- Click the ‘Posts’ tab.
- Click the ‘Add New sub-tab.
- Start filling in the blanks: enter your post title in the upper field, and enter your post body content in the main post editing box below it.
What should you write in your blog post?
When you are writing your blog post, consider your audience by doing keyword research so that they can find out what they are looking for in your blog.
How should you write a good introduction part for your blog post?
A good introduction part of an engaging blog post should start with a question. A well-formed, creative query captures interest and provokes more questions. A question is also a great way to humanize your brand. For the reader, it will feel like they’re joining you on a journey to discover the answer.
How can you make your WordPress blog look professional?
For your blog post to look professional, long paragraphs should be avoided. And be careful about the word you use in your content as well as their arrangement. If your readers repeatedly find errors in your blog post, they will notice you are not a professional to take advice from. You can use a tool like Grammarly on your device to aid you in sentence correction while writing your blog post. Check out the list of our blogging tools (tools we use in our creative work) for more.
Conclusion
Hope this article has helped you know how you can write or publish an article (post) on your WordPress blog for the first time. Please comment below.
Subscribe to our YouTube channel for more updates. You can also find us on Facebook.
About the writer
Abdulrazaq Yahaya is a web designer with over five years of experience presently studying Electrical & Electronic Engineering.

