Do you want to create a custom email address for your WordPress blog? A custom email address, also known as professional email address helps you look professional when dealing with other businesses and customers online.
It’s very important to create a custom email address for a website which must contain your domain or company name like this [email protected].
Happily, you can use your WordPress hosting cPanel to create it for free. With a small amount of money, you can also use G Suite or ZOHOMAIL to create a professional email address.
In this article, we will show you step-by-step how to set up a custom email address via your, Gmail and G Suite step-by-step.

Before we start off, let’s know what a custom email address is.
What is a custom email address?
A custom email address is an email address that carries your business name in it, for example, [email protected].
Perhaps, if you are to create an email address like the one used as an example above with free company (say Google), you would end up getting [email protected] which is not good for your business in the eyes of your customers and organizations you partner with because they do not look professional.
People find a professional email address more important and trustworthy.
Without paying any money, you can own a custom email address via your web hosting cPanel. We have step by step guides on the top best WordPress shared web hosting companies and also how to create a website.
If you already got a domain name and web hosting (website), then you are all almost ready to create a custom email address.
Why should G Suite be used to create custom email address?
You may ask why should G Suite be used when you can create an unlimited email address with your own domain name?
Email is one of the most important communication tool for business owners. If you don’t have a custom email, then it can indirectly and directly hurt your business.
The reason why we recommend creating a custom email with G Suit the fist option over cPanel method is that most web hosting email servers are unreliable, restrictive, isolated, and less secure. Sometimes, you wouldn’t even know if the email you sent was actually delivered.
Gmail is the #1 method in creating an email address with 1.5 billion monthly active users. G Suite on the other hand is owned by Google to help business owners create custom email using their website. Presently, G Suit has over 4 million businesses and 80 million students / educators.
G Suite works with your own domain name, which allows you to use Gmail to create your professional custom branded email address.
Below are some of the benefits of using G Suite and Gmail for creating a custom email address:
- You get a custom business email address on your own domain.
- Have a solid security and spam filters.
- You have the 30 GB storage of a free Gmail Account.
- Be able to check your email using Gmail app on any device.
- Works great with Outlook and can even sync old Outlook accounts.
- Each user can have up to 30 email aliases.
- You can use Google Calendar, Google Hangouts for chat, video, and voice calls on your own business email address.
- No advertisements as in Gmail
- Can use as your primary contact email address on your WordPress blog.
- You will enjoy the feature of high deliverable, no delaying, and no ending up of mails in spam folder and among others.
Now that you have known the benefits and why a G Suite should be used for creating a custom email, let’s take a look at how to do it step-by-step.
We and some of our customers have been using G Suite in creating a custom email address and can honestly say it’s the best.
How to create a custom email address with G Suite
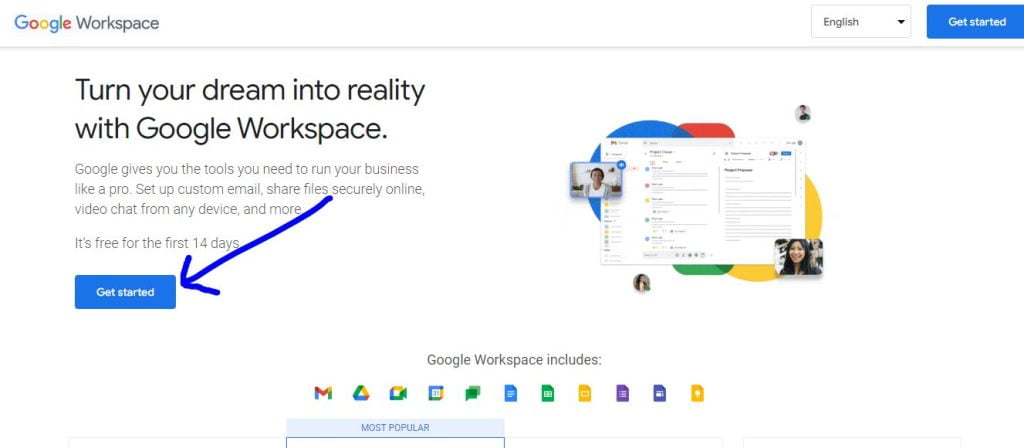
To create a custom or office email address, the first thing you’ll need to do is to signup for a G Suite account at Google Workspace.
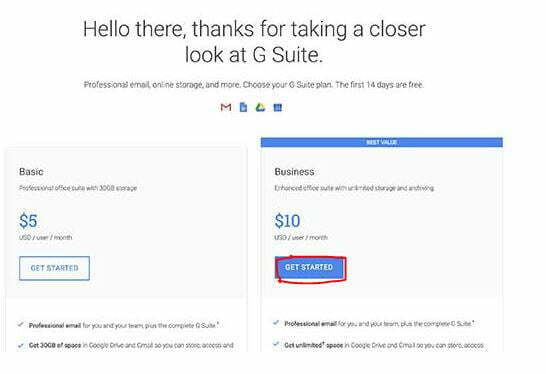
Note that you will pay $5/month. If you pay annually, you get 2 months free which is $50/year.
Their service is reliable. The important part about them is they offer a free 14-day trial which allows you to use every feature.
They have all the powerful features like Gmail, Drive, Calendar, etc.
Simply visit the Google Workspace website (G Suite) and click on the Get Started button and choose any plan you want to use.
After that, enter your business name, the number of employees, and the country of your business residence. You can choose the number of your team or just yourself for 1 user account.
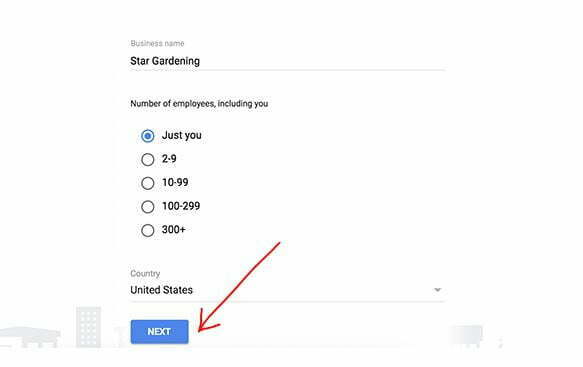
After choosing the number of your team, click on the next button to continue.
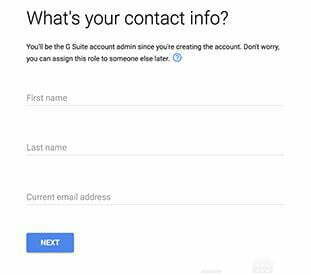
Next, enter your personal contact information; your name and email address.
If you have already got a domain name, then click on ‘Yes I have one I can use’. Otherwise, click on ‘No, I need one’ to register a domain name under the question “Does your business have a domain name?”.
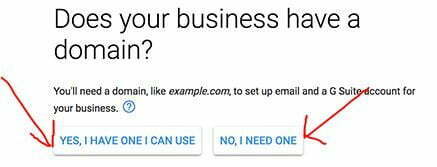
If you choose the “No, I need one” button, you will be charged separately for registering a new domain name. Thus, it’s good to read our step-by-step guides on how to register a domain name for free when you buy a web hosting.
However, if you choose “Yes, I have one I can use” option, that means that you have got an existing domain name, then you will need to verify ownership of the domain name. You will know how to do that later.
In the next step, create your G Suite account by entering your preferred username and password.
Enter a username that you want to use as your professional email address as your username will automatically be as your first professional email address.
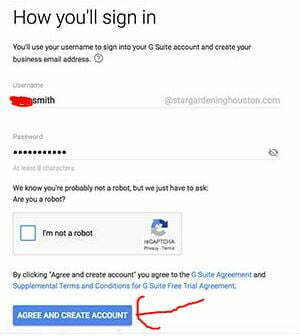
Once you have successfully created your G Suite account. Check the human verification box on and click on the ‘AGREE AND CREATE ACCOUNT’ button.
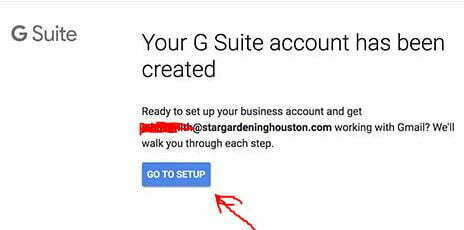
When your G Suite account has been successfully created, click on the ‘GO TO SETUP’ button.
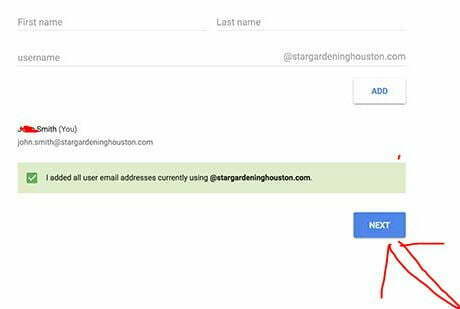
On the setup page, add more people to your account. If you want to create more accounts for your employees or departments, you can also do that here.
To that, just click on ‘I have added all user email addresses’ and click on the next button.
On G Suite, you can always add more users to your account and create their email addresses later when needed.
This step is when you will need to verify the ownership of your domain name which you registered elsewhere.
You will be given an HTML code snippet that you need to add to your website for ownership verification purpose.
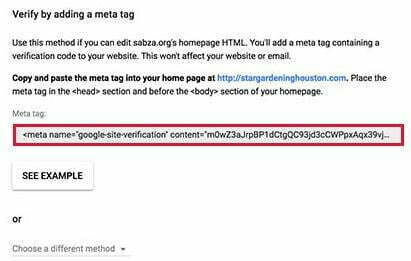
You can also use other methods to verify your domain ownership. One popular method we recommend our readers to use is uploading a HTML file to their website using an FTP client or file manager app in their hosting account dashboard.
If you don’t have a website, then you can use also use the MX Record method. You will see step by step instructions to do that once you choose this method.
As a reader of ours, we hope you have got a WordPress blog. If you haven’t, read our guide on how to start a WordPress blog.
Below are the steps on how to add the verification HTML code snippet in WordPress to verify your domain name.
To do that, login to your WordPress admin area in a new browser tab to install and activate the Insert Headers and Footer plugin. See our step by step guide on how to install a WordPress plugin.
Upon the successful installation and activation, go to Settings » Insert Headers and Footer page and paste the HTML code you copied from G Suite under the ‘Scripts in Header’ section.
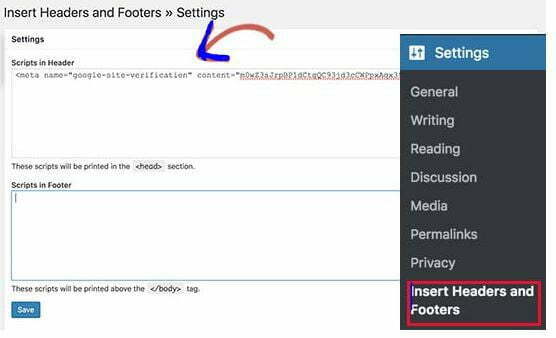
After your setting, click on the ‘Save’ button to store your settings.
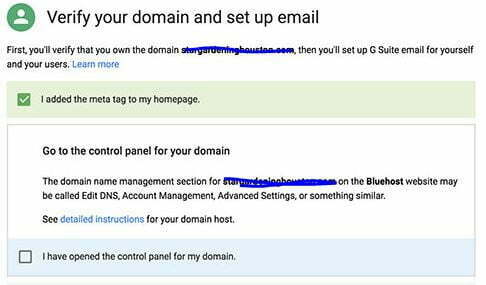
Now switch back to your G Suite setup page and click on the checkbox that says ‘I added the meta tag to my homepage’.
You will need to add MX records if you have an existing domain name and website. If you registered your domain name via Google, you don’t need to add MX records.
If your domain name is not registered with Google, it will reach your domain name, but not to the Google servers.
Thus, you will need to set up the right MX records on your domain name settings, in order for Google’s servers to send and receive emails for your business.
To do that, you will need to login to your web hosting account, or your domain registrars account.
Here is how to add MX records on your domain name cPanel. This method is basically the same on all web hosts and domain registrars. What you’ll have to look for is the DNS settings under your domain name.
Login to your web hosting and click on the “DNS zone editor” button. On the next page, select your domain name and then click on the ‘Manage’ link next to DNS Zone Editor option.
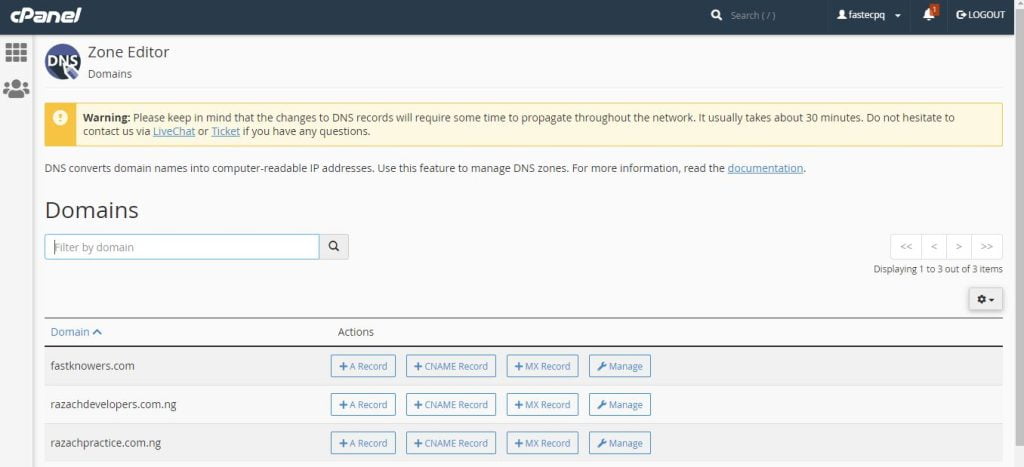
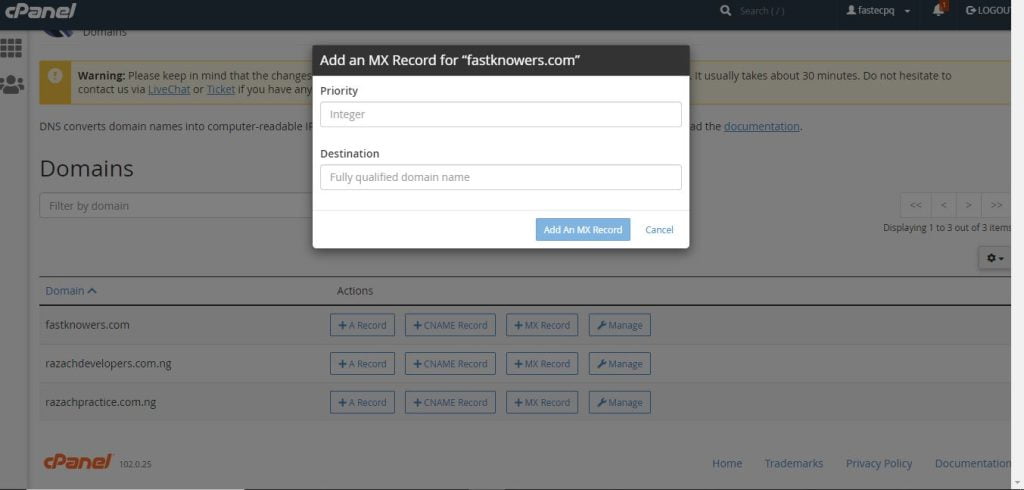
Now, click on the MX record button and enter your MX records.
Your web host will now open your DNS zone editor. Now, you need to switch back to G Suite setup screen and check the box that says ‘I have opened the control panel of my domain name’.
It will now show you the MX records that you need to enter. You will also see a link to the documentation which shows you how to add these records to dozens of hosting and domain services provider.
Here is how you will add this information to your DNS settings:
Click on ‘Add Record’ button to save it.
Once you are finished, switch back to G Suite setup and check the box next to ‘I created the new MX records’
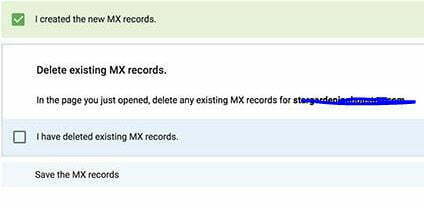
Now, delete any existing MX records that are still pointing to your website hosting or domain name registrar.
To do this, switch back to your DNS zone editor and scroll down to the MX records section. You will see the MX records you created earlier along with an older MX record still pointing to your website.
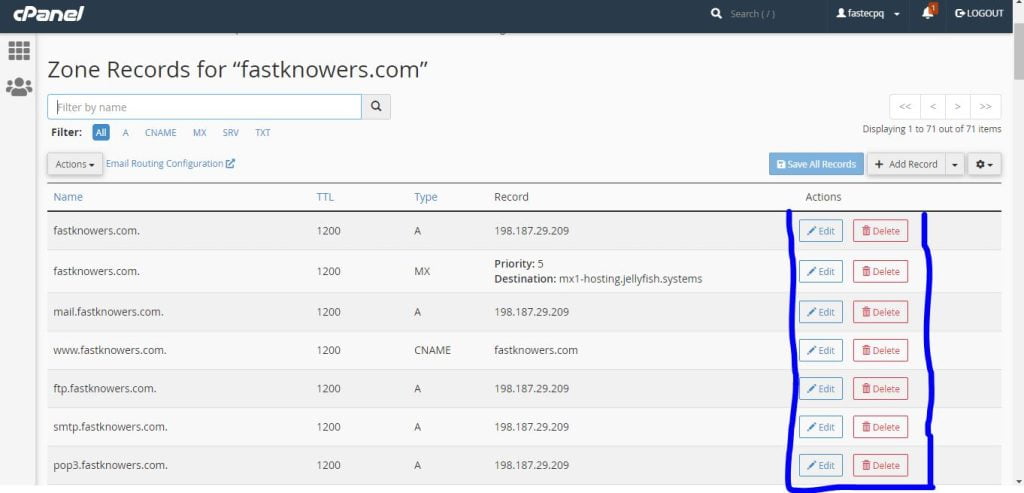
Click on the delete button next to the old MX record to delete it.
After that, visit the G Suite setup screen and check the box that says ‘I deleted existing MX records’.

You will now be asked to save your MX records. For some providers, once you add MX records they are already saved, for others you may need to manually save MX records.
Once you have saved MX records, check the box that says ‘I have saved MX records’ in G Suite setup.
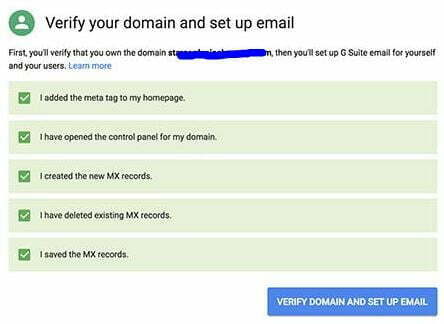
Finally, click on the ‘Verify domain and setup email’ button to exit the setup option.
How to link your custom email address with Gmail
Your just newly created custom email address can be used the way you use your Gmail addresses. If you follow these steps, you can access it by visiting Gmail Website and sign in with your email address, e.g. [email protected].
To setup your custom email address so that you can use it on your mobile address the way you use your Gmail email addresses, visit the admin console.
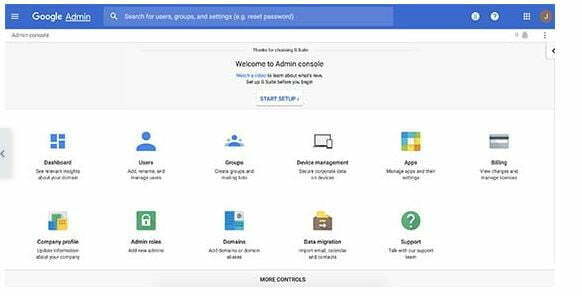
Google admin console is where you can add/remove new users to your domain name. Each of your users will have 30 GB storage and all the same features, but they will not have access to the admin console. You can remove those users at any time you want.
How to troubleshoot your custom email address on G Suite
If your web host does not use a dashboard like we have shown in the screenshots above, G Suite has detailed documentation for many of the popular web hosting and domain registration service providers.
Visit the set up MX records (Hosts specific steps) page and then locate your domain registrar or web host from the list.
If you do not find your service provider in the list, then you can ask them directly to help you setup G Suite for your domain name.
You may read our expert step-by-step guides on how to troubleshoot error on WordPress.
Conclusion
Hope this article helped you know how to create a custom email address with G Suite (Google Workspace) and set it up Gmail. You may also read how to sign up and set up Google my Business account.
If you enjoyed this article, then please subscribe to my YouTube channel for regular WordPress tutorials. You can also find us on Facebook.


I went through this guide, It was helpful. My friend in Georgia sent it to me, and it helped solved my problem,
Hi Jessica
You’re very welcome! I’m glad the guide was helpful.
Thank you for sharing your feedback
This is the best article on this topic. Everything is helpful. Thank you Mr Abdulrazaq Yahaya. 👍👍
Hi Naomi fasudo
I really appreciate 🙏
I really appreciate this guide. Mr Abdulrazaq Yahaya, thank you so much for maintaining this platform. But one thing about creating a custom email address on cPanel is that you can’t link it to your email address on your phone. If there is anything like that, please help me. I don’t have time to be logging into my cPanel everyy time I want to check my email.
Dear Thaniy, i understood your comment. For more help, please can you contact us?
I have a custom email address for my website. The problem is that I need to login to my cPAnel every time I want to check my email inbox which is stressful. Can you show us how to configure it on the mobile phone just like gmail? Thanks
The cPanel email address is good. But its problem is that I have to login to my cPanel anytime I want to check my email inbox. Is there no any way I can do to launch it on my phone?